Yoga translates into yolk or union to the Self. As outlined by Patanjali, yoga is comprised of 8 limbs:
- Yamas (Restraints)
- Niyamas (Observations)
- Asana (Postures)
- Pranayama (Breath)
- Prathayara (Withdrawal of the senses)
- Dharana (Focused concentration)
- Dhyana (Meditation
- Samadhi (Bliss)
Asana or postures helps move energy through the body and prepare it to sit for meditation. We have compiled a list of the top twenty yoga postures to help strengthen the body and prepare it to find stillness in meditation.
Sukhasana — Easy Pose

Sukhasana or easy seated pose looks like a breeze. However, for those who have tried to meditate for more than 5 minutes seated on the floor knows sukhasana can be challenging. Sukhasana helps strengthen the back while stretching the knees, hips, and ankles.
To practice:
- Start seated on the floor. If you have tight hips or knees, it can be helpful to sit on top of a blanket, wedge or blocks.
- Cross the ankles, while letting the outsides of the knees release towards the floor.
- Adjust the pelvis so it is neutral as opposed to rolling backward.
- Lengthen the spine while letting the shoulders relax.
- Take the gaze forward, letting the chin stay parallel with the floor.
Tadasana — Mountain Pose

Tadasana or mountain pose it another posture that appears to be simple. To many, it looks like the practitioner is simply standing. However, when practiced correctly it is a challenging posture when being mindful of alignment and activation of the muscles. Tadasana is beneficial to help the combat a modern lifestyle of sitting behind a desk or hunching over a smartphone. Mountain pose helps improve posture, strengthen the legs and the back while lengthening the spine. It is also a posture to learn well as it is the foundational posture for standing yoga postures.
To practice:
- Start in a standing posture and let the feet come together with a few inches of space between the feet.
- Root all four corners of the feet into the floor.
- Engage the leg muscles and lift pressure up off of the knees.
- Adjust the pelvis so it is neutral.
- Lengthen the spine from the lower back up through the neck while lifting the top of the head upward.
- Let the shoulders blade downward.
- Take the gaze forward and let the chin stay parallel with the floor.
- Rotate the palms so they are facing forward while the arms release along the side of the body.
Urdhva Hastasana — Upward Salute Pose

Upward salute or Urdhva Hastasana is commonly found in yoga classes as it is often taught during sun salutations. Upward salute helps stretch the arms, shoulders, and obliques while calming the body.
To practice:
- Start in mountain pose.
- Inhale and lift the arms above the head with the palms facing each other. The hands should be shoulder-distance apart.
- Straighten the arms and rotate the shoulders internally. Avoid lifting the shoulders.
- The gaze can either be forward or up towards the hands.
Uttanasana — Standing Forward Bend Pose

Uttanasana or standing forward bend helps stretch the hamstrings, hips, and spine while strengthening the thighs and knees. It has also been known to decrease stress and assist with digestion. It is frequently practiced during sun salutations.
To practice:
- From mountain pose, lift into an upward salute and then hinge at the waist.
- Let the hands come towards the floor. If they cannot reach touch the floor
- Keep the activation of the legs while lifting the tailbone.
- Let the hips stay in line with the heels
- Release the head, face, and jaw.
Virabhadrasana I — Warrior I Pose

Warrior I or Virabhadrasana I is a strong pose that increases stamina while strengthening the shoulders, arms, calves, and ankles. The posture also helps stretch the groin, belly, and chest.
To practice:
- From mountain pose, step the right foot back and rotate the toes 45 degrees.
- Bend the front knee while the back knee is straight. Be sure to keep the front knee from overextending the ankles or the toes.
- Ensure the hips are lined up evenly with the hip points facing forward
- Lift the arms overhead and take the gaze forward.
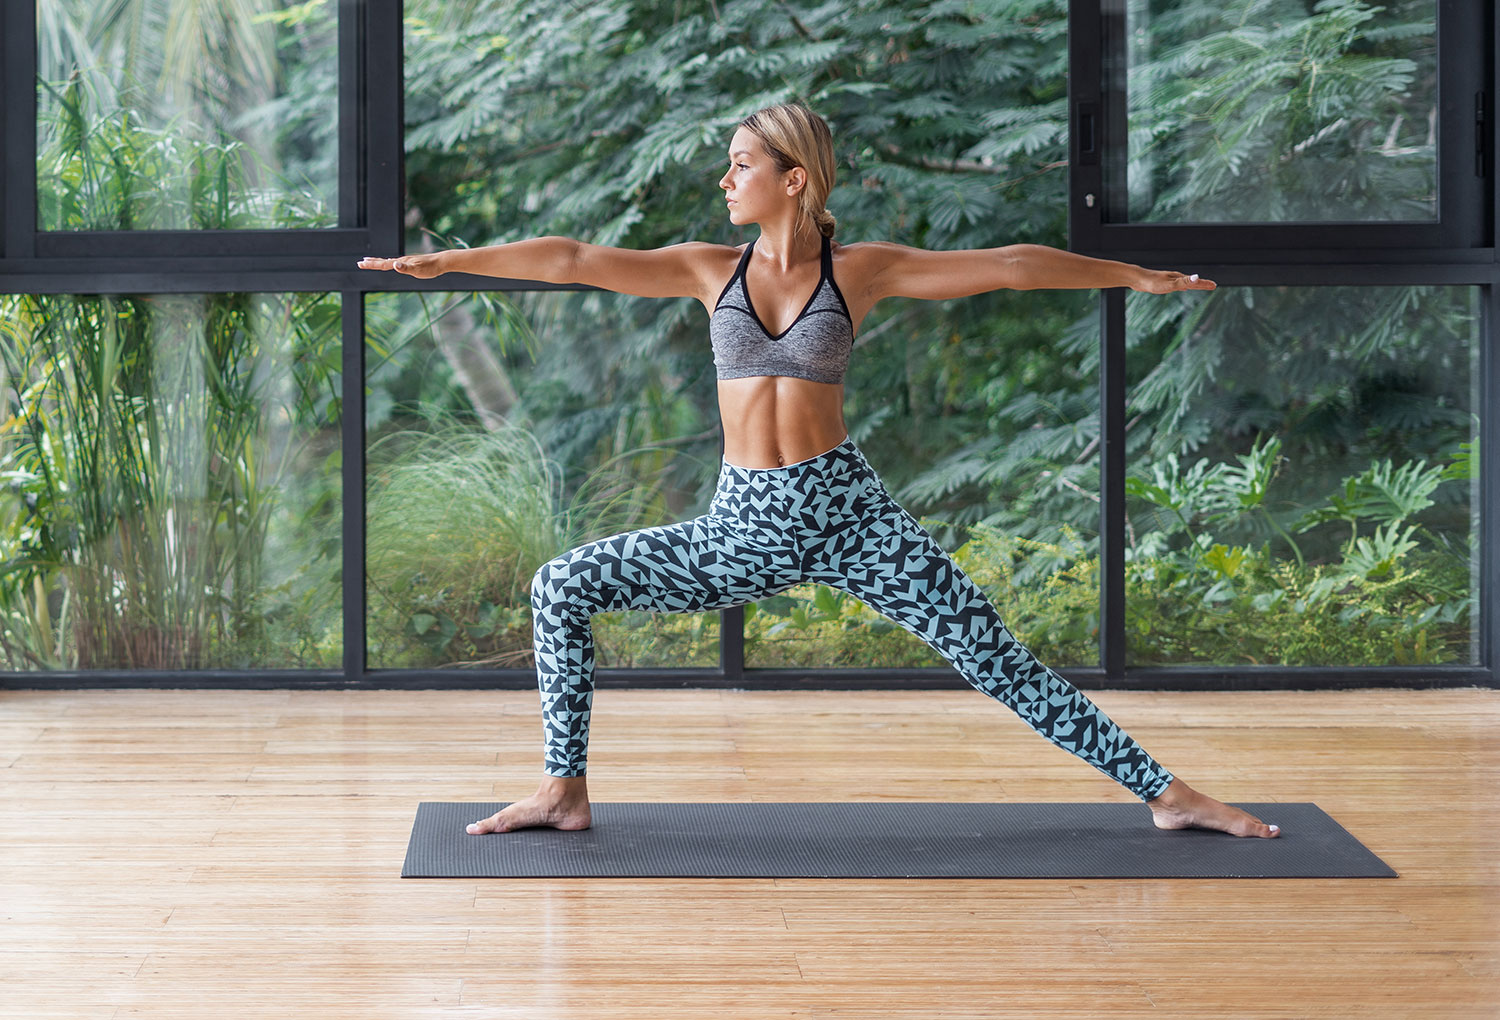
Virabhadrasana II — Warrior 2 Pose

Another powerful posture in the Warrior family that strengthens the thighs and arms while stretching the hips is Warrior I. This asana also helps with focus and balance.
To practice:
- Start by reaching the arms out to the sides at shoulder level with the palms facing down.
- Step out the feet as wide as the wrists. Let the toes face forward.
- Rotate the right foot outward 90 degrees so the toes are facing the same direction as the fingertips.
- Bend the right knee 45 to 90 degrees.
- Externally rotate the right thigh so the knee is facing the same directions as the toes.
- Ground through the feet while extending the spine upward.
- Take 5 to ten breaths before switching sides to the lefthand side.
Parivṛtta Anjaneyasana — Crescent Lunge Pose

Crescent lunge is a powerful pose that incorporates balance while strengthening the thighs and stretching the hips, shoulders, and chest.
To practice:
- From mountain pose, step the right foot back as far as you can.
- Lift the back heel and bend the left knee 45 to 90 degrees.
- Extend the arms overhead with the palms facing each other, the arms should be next to the ear.
- Keep the gaze forward on something that is not moving to help stay balanced.
- Hold for five to ten breaths and then repeat on the opposite side.
Virabhadrasana III — Warrior 3 Pose

Another balancing pose, Warrior 3 can build some serious strength in the legs, core, and shoulders.
To practice:
- From crescent lunge, let the hands come towards the hips.
- Ground into the front foot and hinge forward at the waist.
- Lift the back foot up as if creating a “T” shape with the body. Keep the foot gently flexed with the toes pointing down.
- Once the leg is lifted reach the arms forward. Hands can be placed on the wall or a chair for balance.
- Ground down through the standing leg while pressing outward through the heel and the torso.
- Repeat on the opposite side.
Vrkasana — Tree Pose

Tree pose is another balancing pose that helps strengthen the legs while stretching the groin and inner thighs. While it can be practiced in the middle of the floor, it can also be practiced near a wall or chair while working on balance.
To practice:
- Start in mountain pose with the hands on the hips.
- Find a focal point to look at to help maintain balance.
- Lift the right knee while noticing the hips, the crest of each hip should stay in line with each other.
- Let the right knee rotate out to the side and place the sole of the right foot on the inside of the left leg. Avoid placement that places any pressure on the opposite knee.
- Extend the arms overhead. The palms should face each other with the arms are along the side of the ears.
- Repeat on the opposite side.
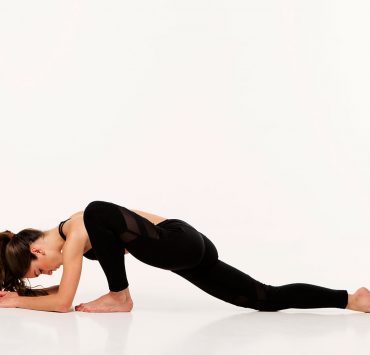
Adho Mukha Svanasana — Downward Dog Pose

One of the most well-known yoga postures, downward dog is a total body strengthener that also stretches the body as well.
To practice:
- Start in tabletop posture on the hands and knees.
- Walk the hands two to three handprints forward. Spread the fingers wide and keep the hands shoulder distance apart.
- Curl the toes and lift the hips up while straightening the legs. The feet are about hip distance apart.
- Press the hands into the floor while pressing the hips back, creating a lengthening in the spine.
- Relax the head.
Urdvha Mukha Svanasana — Upward Dog Pose

Practiced frequently due to its inclusion in sun salutations, upward facing dog is a posture that is challenging on the body but is often be practiced with poor alignment. Spend time working slowly through the posture to keep the body safe while stretching the chest, core, thighs, and ankles while strengthening the spine, wrists, and arms.
To practice:
- Start by lying on the stomach.
- Press the hands into the mat directly underneath the shoulders.
- Press the tops of the feet into the floor, hips distance apart.
- While pressing the hands and tops of the feet down, lift the rest of the body off of the floor. The only meeting points between the body and the floor should be the hands and the feet. Everything else should lift.
- Relax the shoulders while lengthening the neck and take the gaze forward to where the floor and the wall would meet.
Phalakasana — Plank Pose

Plank pose helps strengthen the abdominals and the arms. Be careful if there are any issues with the wrists.
To practice:
- Starting from downward dog, shift the weight forward and let the shoulders come over the wrists.
- The feet may need to step back farther so the hips are not lifting too high up. There should be a gentle downward line from the back of the neck down to the heels.
- Engage the abdominals.
- Broaden the collarbones and lift the sternum to help keep the shoulder blades from collapsing.
Chaturanga Dandasana — Four Limbed Staff Pose

Another posture that is included in sun salutations is chaturanga dandasana. This posture takes a while to build up to so it is important for practitioners to honor their practice and find the most appropriate modification.
To practice:
- Start in plank pose.
- Activate the abdominals, rotate the inner thighs, and engage the chest.
- With the gaze towards the floor just over the nose, bend the elbows keeping them towards the rib cage.
*If the lower back starts to sag and the posture feels more like a belly flop than a push-up, lower the knees down for a modified version to build strength. When doing the modified version make sure the hips are more towards the front of the mat than the knees.
Ardha Pincha Mayurasana — Dolphin Pose

Like downward dog, dolphin helps strengthen and stretch the whole body with some extra work for the shoulders.
- Start in tabletop.
- Press the forearms into the mat with the fingertips facing forward.
- Curl the toes and lift the hips up while straightening the legs.
- Press the hips back as if in a downward facing dog.
- Relax the kneck taking the gaze towards the shins or the toes.
Dandasana — Staff Pose

As a foundational posture for seated postures, staff pose helps tone the whole body while creating a calming effect.
To practice:
- Sit up tall and extend the legs in front of you.
- Gently flex the feet.
- Adjust the pelvis so it is neutral.
- Keep the chin parallel to the floor.
- Press the hands in the mat underneath the shoulders.
Baddha Konasana — Cobbler’s Pose

Also known as butterfly pose, this posture helps open the hips while having a calming effect on the body.
To practice:
- Start in staff pose.
- Bend both knees and bring the feet towards the groin area.
- Let both knees release towards their respective sides and hold onto the ankles.
- Let the outside of both legs continue to release downward towards the floor.
*Try to avoid rounding in the upper or lower back. Having a neutral pelvis and extending the crown of the head upward will help create proper alignment in the spine.
Ananda Balasana — Happy Baby Pose

Happy baby helps stretch the spine and the groin while helping to reduce stress in the body.
To practice:
- Start on the back and bring the knees towards the chest.
- Separate the knees so they are slightly wider than the rib cage.
- Keep the knees bent, bring the feet up towards the sky.
- To grab onto the feet either hold onto the outside of the feet with the hands, wrap the index finger and middle around the big toe on each foot, or take a strap and place it around the arch of both feet.
- Gently pull down on the feet, so the knees get closer towards the floor. While pressing down, try to keep the feet stacked above the knees.
Setu Bandha Sarvangasana — Bridge Pose

Both an inversion and a backbend, bridge pose helps stretch the chest, neck, and the spine.
To practice:
- Start by lying on the back with the knees bent and the feet planted.
- The feet should be about hip distance apart with the ankles underneath the knees and the toes pointing forward.
- Let the hand press in the mat along the side of the body.
- Lifts the hips towards the sky, then roll up the lower back.
- The hands can remain on the floor or you can lift them up and clasp them together underneath the back.
*Important Tip: While practicing bridge be sure to always keep the gaze towards the sky. Turning the head left or right can cause injury to the neck. This posture should not be practiced if there are injuries to the neck.*
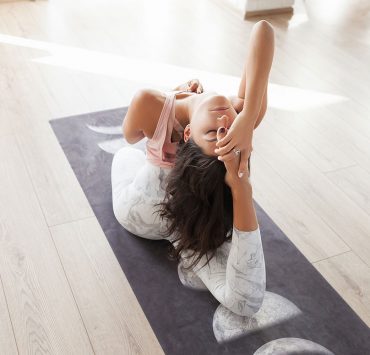
Supta Matsyendrasana — Reclined Spinal Twist Poses

A calming way to end almost any asana practice, reclined twists help stretch the back.
To practice:
- Lying on the back, bring the knees in towards the chest.
- The arms will release out to the sides on the floor, in line with the shoulders with the palms facing up.
- Release the knees to the right-hand side of the floor. Try to keep the knees and feet together and the tops of the knees in line with the chest or as high as the body will allow.
- Taking the gaze towards the left hand
- Repeat on the opposite side
Savasana — Corpse Pose

The most important posture that all other postures lead up to is corpse pose.
To practice:
- Lie on the back.
- Let the arms come along the side of the body palms facing up.
- The feet are hip distance apart, letting the toes release outward.
- They eyes can start to close but refrain from falling asleep.
These top twenty yoga postures will help anyone get a well balanced asana practice.