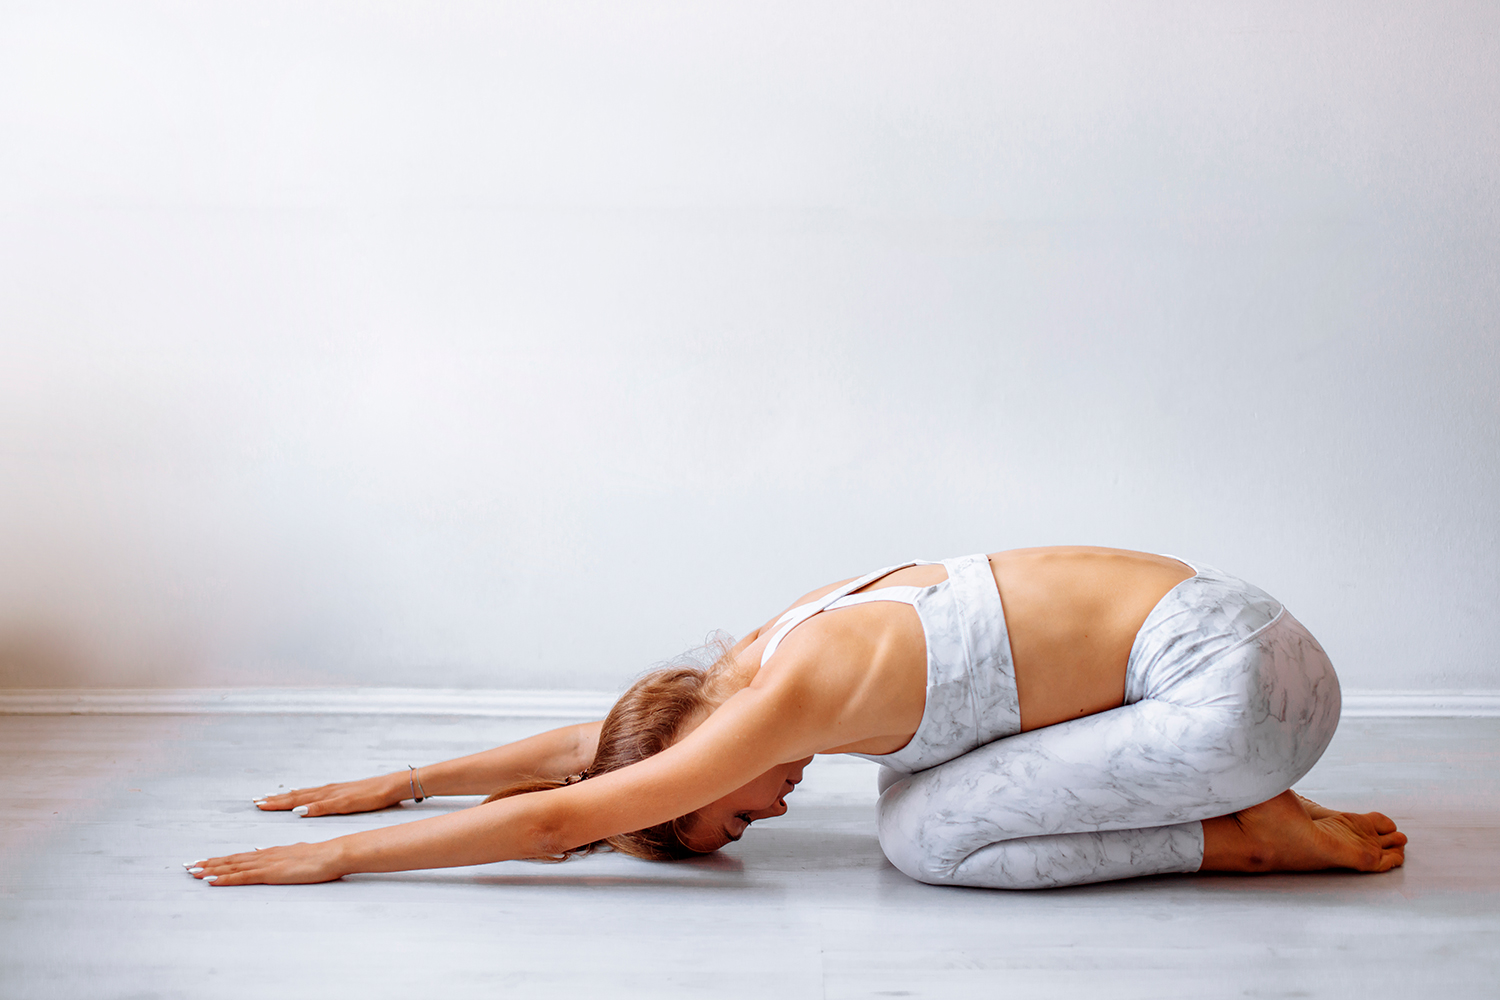
There’s something truly comforting about Balasana, otherwise known as Child’s Pose.
This pose is encountered in just about every yoga class. It’s almost as common as Savasana, the final resting pose, or Samsthithi, the equal standing pose. It’s absolutely foundational.
Most yoga teachers encourage their students to take Child’s Pose whenever they start to feel tired or stressed in their practice.
If a student feels their heart rate or breathing speeding up to uncomfortable levels it’s time to take Child’s Pose.
If a student starts to feel overheated or light-headed it’s time to take Child’s Pose.
If a student realizes too late that they don’t have the energy for the 90 minute core-power-handstand-flow-jam they signed up for then it is most definitely time for a nice long Child’s Pose.
In this position the body is allowed to release in a well-contained, rounded position with the back to the sky and the senses withdrawn.
The mind naturally slows down. Our awareness naturally begins to introspect. Our nervous system gives our body permission to slow down
It is the ideal recovery position for yoga. It can also be incredibly useful as a stand-alone tool for stress relief and down-regulation in your day-to-day life. 5 minutes in Child’s Pose can be a game-changer.
There are lots of different ways to approach this versatile pose, so let’s explore some.
How to do Child’s Pose

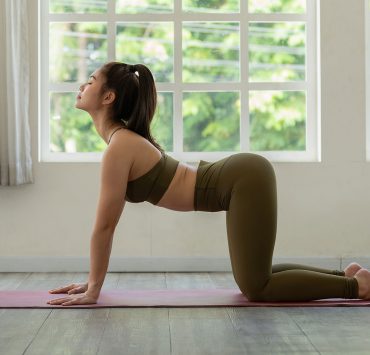
Starting on all fours in a tabletop position with the legs together and the tops of the feet on the floor. Sit back so that the sit bones begin to sink down towards the heels.
Fold the upper body forward so that the chest comes to rest on the knees and place the arms on the floor alongside the body with the hands pointing backwards, palms up towards the ceiling.
Place the forehead on the floor. If the body feels comfortable, begin to consciously release all unnecessary tension from the body, allowing the hips and abdomen in particular to settle.
Release all of the tension from the face. Close the eyes or relax the gaze, smoothing out the skin between the eyebrows. Relax the jaw, separate the teeth and allow the inside of the mouth to expand.
Draw the awareness to the breath.
Breathing in Child’s Pose

There are many ways to work with the breath in Child’s pose. Here are 2 good suggestions:
1. Child’s pose is one of the best poses for working on drawing the breath into the back of the body. Keeping the abdomen relaxed, expand through the whole trunk on the inhale, paying special attention to the movement of the back of the rib cage.
Keep the abdomen relaxed for the first half of the exhalation and then engage it just enough to slightly draw it in on the tail of the exhalation.
Focus on taking full, calm and consistent breaths, consciously lengthening the exhale. Make a very subtle hissing sound emanating from the back of the throat to use as a gauge for the quality of the breath.
2. Quiet and relax the breath and release through the abdomen. Breathe normally and instead focus on drawing the awareness to the sensations arising in the physical body. Begin at the bottoms of the feet and scan through the body to the top of the head, observing whatever feelings arise.
Variations of Child’s Pose
Extended Child’s Pose

This version may be more comfortable for people with a wider midsection or bigger legs. It’s also a deeper stretch of the hips and promotes a slightly more active extension of the back. Those with very tight hips or sensitive knees may find this version less comfortable.
Starting on all fours in the tabletop position, begin by taking the knees wide, close to mat width apart. Sink the seat back towards the heels, releasing through the hips.
Reach the arms overhead roughly shoulder width apart, palms down. The elbows can be on the floor and slightly bent.
Experiment with drawing the breath deep into the lowest part of the abdomen until you feel the stretch in the hips deepen.
Fetal Position on the Back

If there’s an injury to the knee or lower back, or if the ordinary downward facing version of Child’s Pose isn’t feeling good for whatever reason, it may be a better option to flip the pose over and take the same shape lying on your back.
Simply draw the knees in towards the chest and wrap the arms around the legs. If you’d like to find some opening through the hips, take the knees wide and draw them down with a bit of gentle pressure.
This pose can be done passively or actively. If you’d like a little core engagement, simply lift the shoulders off the floor and draw the chin into the chest. This version of the pose is often done immediately before Savasana to encourage a greater sense of release following all that core activation.
Fetal Position on the Side

This might be one of the most restorative poses out there. It’s very close to the classic first-aid recovery position and it can be used to recover at the end of a vigorous practice or during moments of increased anxiety or stress outside of the practice.
For many, it will encourage down-regulation of the nervous system more effectively then any other pose. That’s why it’s often done when coming out of the slightly more vulnerable position of Savasana before rising from the floor.
Simply lie down on the side of the body, drawing the knees towards the chest and resting the head on the arm. Traditionally, it is almost always performed on the right side to stimulate the Ida Nadi, an aspect of the subtle body thought to encourage relaxation.
Active Child’s Pose

This version engages the core and stretches the back and shoulders by actively tucking the tailbone towards the floor and pressing down through the palms of the hands, lifting the elbows.
This pose is a great way to gently warm up the body before a more active practice.
This version of Child’s Pose is one of the best ways to experience what it means to engage the core while still breathing into the belly. The deeper abdominal muscles are engaged posturally while the main muscles of breathing stay mobile.
This can be a very instructive way to establish this pattern in the body before carrying it into more complicated postures.
Side Bend in Child’s Pose

From an active Child’s Pose, walk the hands out to the left, beyond the mat, stretching through the right arm.
This is a great way to lengthen through the side body. While in the pose think about expanding through the right side of the rib cage with every inhalation. Slightly engage the left oblique muscles on the side of the abdomen. Keep the front of the abdomen relaxed.
Repeat on the other side.
Puppy Pose

Instead of taking Child’s Pose as a replacement for Downward Dog in a flow, consider Puppy Pose, which is like a cross between Child’s Pose and Downward Dog and engages the upper body in the same way as Downward Dog.
Place the knees hip-width apart and bring the hips over the knees. Reach the hands forward pressing them into the floor and place the forehead on the mat. Keep the arms strong, lifting the elbows off the floor. Allow the spine to lengthen, tilting the sitting bones up towards the ceiling.
Modifications for Child’s Pose
Tight Hips or Sore Knees

If sinking the sitting bones towards the heels is feeling uncomfortable because of pressure, tightness or pain in the knees or hips it may be advisable to elevate the hips by using a prop.Simply roll up a blanket or a pillow and place it over the calf muscles in the backs of the legs. Experiment with placing it higher or lower on the leg to find the ideal position. The further away from the knee the prop sits, the deeper the stretch will become.
Make sure the prop is placed in such a way that you can release completely into it.
Stiff Neck or Upper Back

If you have stiffness or sensitivity in the neck or upper back, or if you have larger proportions in the chest or belly, the head may not come right to the floor in Child’s Pose without flexing uncomfortably through the upper spine.
If this is the case simply place a foam block underneath the forehead to allow the neck to stay lifted and the spine to lengthen.
Another good option in this case is to place a large, firm bolster on the mat length-wise and lay the front body over it. The head can be turned to the side and either placed directly on the bolster or supported by a towel or a thin blanket.
Sore Ankles or Feet

Some people may find it difficult to place the tops of the feet on the floor with the toes fully pointed. If the front of the leg is stiff this may cause pain in the ankle joint.
People with weak arches may also find that the foot cramps up in this position. It may be possible to release this by spending a few moments tucking the toes under and stretching the bottom of the foot beforehand or it may be better to simply modify the pose.
To elevate the heels and take some of the pressure off the ankle and the front of the foot simply roll up a towel or a yoga mat and place it underneath the fronts of the ankles. The toes should stay rooted to the floor.
Make sure to only use as much height as you need as this modification may send some of the weight into the knees.
The Secret “Advanced” Child’s Pose

Child’s Pose is not meant to be a challenging pose, you just release all your muscles into a supported position and lie there.
But if we’re being honest, many of us will find this pose challenging for precisely that reason. Lying perfectly still, with nowhere to go and nothing to do can be one of the most challenging exercises of all.
That’s why these types of poses are so important, even in an athletic practice…scratch that…especially in an athletic practice.
It’s OK to fidget a little bit and it’s definitely OK to adjust the pose if discomfort or pain arises, but play around with remaining stiller and stiller for a little bit longer each time you take it.
If we’re aiming to gain true mastery over the body we must learn how to release our muscles as much as we learn how to engage them. We must learn how to remain still as much as we learn to move. So the “advanced” version of Child’s Pose is the one where we simply don’t…do…anything.
The important thing to remember about Child’s Pose is that it should feel relaxing, or at least help train us to relax if relaxation isn’t quite happening.
With this in mind, consider a variation or modification that you can truly release into.
Even the active versions of the pose should be gently activated. As exercises, they are meant to train the body to calm down while certain muscles are still engaging in certain ways. If the breath is in any way restricted or impeded then the pose is not having it’s intended effect.
So sip on some chamomile, burn some incense, grab a bolster or a blanket and spend some time in Child’s Pose! It’s the perfect way to wind down!