Here’s a truth: Whether you want a six pack or you’re just looking to carry your groceries without your low back cramping, having a strong core will get you there.
I’ve learned through years of yoga & functional strength training that working the entire circumference of the middle body is the way to build a strong core… It literally strengthens the “core” of the body from which all movement starts. Today, you’ll experience a powerful, yet accessible 30-minute beginner workout to strengthen the entire core.
Benefits of Core Strength

The core of the body is more than just your abs.
Your core is your abdominals and back, plus the upper leg muscles.
Strengthening the core creates stability in movement, like walking, running, bending, and even sitting. This can help prevent injury by increasing the level of muscle control when we perform day-to-day activities.
Further, strengthening the entire core gives the body a chance to address postural imbalances over time.
For example, I faced severe hip pain for several years due to weakness in the glutes & hamstrings. Today, I’m pain-free by working on those muscles as part of a general core routine. The exercises created balance in my body.
A strong core is key to excellent posture at the office & on the couch, too.
The Core is More Than the Abs

The beautiful thing about working the core is that anyone can do it at home, no weights or equipment required. Bodyweight training & exercises are more than enough to build a healthy core.
The exercises that follow target all the major core muscles from front to back. These include:
Abdominals
– The muscles at the front of the belly that create a six-pack, plus the deeper muscles like the rectus abdominis, transverse abdominis, diaphragam, and obliques. These muscles connect the legs to the upper trunk for stability and movement.
Back Muscles
– The back supports the spine, which supports the head & neck. Working the back muscles can reduce back stiffness over time. It also provides for long-term health of the spine, shoulders, and neck.
Legs & Glutes
– The muscles that attach the legs to the trunk of the body are part of the core. These include large, powerful muscles like the glutes, upper quads, and upper hamstrings. Working these muscles is especially important to counterbalance weakness caused by lots of sitting, as in an office job.
30-Minute Core Strength for Beginners
You’ll work each muscle group progressively with a peak pose at the end. Feel free to take a short Savasana (rest) at the end of the workout.
Phalakasana — Plank Pose
We’ll start with plank pose to warm up the abdominal muscles, shoulders, glutes, and legs. Variation 2 places more emphasis on the shoulders.
Variation 1: Elbow Plank

Lie on your stomach on the mat.
Place your elbows underneath your shoulders, then clasp your hands together.
Exhale & push through the elbows to lift your trunk off the floor. Squeeze the glutes & thighs.
Hold for 3 breaths. Release, then exhale back up. Repeat three times.
Variation 2: Straight Arm Plank

Come to your hands & knees.
Exhale and feel your belly hollow out. Inhale & press through the hands.
Exhale, stretch the right leg back, then the left leg back. You will be in a high plank position.
Hold for 3 breaths. Come back to the knees, then reach back again. Repeat 3 times.
Vasisthasana — Supported Side Plank Variation Pose

This pose will help strengthen your obliques, glutes, and abductor muscles, all of which make for a stable core.
Instructions:
Lie on your right side on the mat, legs together in one line like a mermaid, left hand supporting you in front of your chest.
Place your right hand underneath your right shoulder. Push through your hand to come up to a side plank, resting your bottom knee on the floor to support. Squeeze your glutes & squeeze the left side of the abdomen to target those obliques.
The top hand can stretch towards the ceiling or rest on the hip.
Hold for 3 breaths, come down, & switch sides. Do each side 3 times.
Bend your left knee to bring the right foor
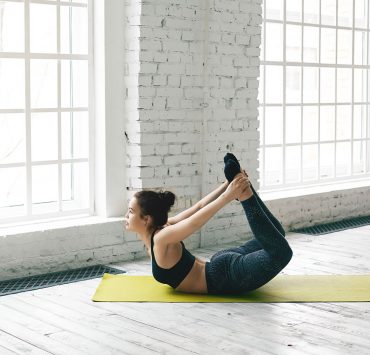
Navasana with Bent Knees — Toes on Floor Pose

Navasana works the deep inner muscles of the abdomen, which are critical for supporting the spine and easing back pain. This supported variation is accessible for beginners.
Instructions:
Sit on the mat with feet together in front of you, knees pointing towards ceiling.
Straighten your arms in front, outside each knee, palms facing the knees.
Exhale & lean back to feel the abdomen engage. Lift the heels off the floor so that only toes are touching. For extra challenge lift the feet off the floor, keeping knees bent.
Hold for 3 breaths. Repeat 3 times.
Salabhasana — Locust Pose

Working the back of the body balances the abdominal work. Rotating the thighs at the beginning of the pose helps support the lower back.
Instructions:
Lie on your stomach on the mat. Lift the right leg up & turn it so the inner thigh lifts towards the ceiling. Now turn the left leg. Bring the legs together.
Lift your feet off the floor by squeezing the legs together and squeezing the glutes. Hold for 3 breaths & release. Repeat one time.
Now, bring your arms into a goalpost shape with palms facing down. Exhale & squeeze the shoulders back & down to lift the chest off the floor. Hold for 3 breaths then release. Repeat one time.
Finally, exhale and squeeze the glutes & shoulders at once to lift legs & chest off the floor. Hold for 3 breaths. Repeat three times.
For extra challenge, straighten the arms in front of the body while lifting the legs.
Leg Lifts

Now that the entire front & back body is warmed up, we’ll do leg lifts to target the important iliopsoas and rectus abdominis muscles, which stabilize the legs during locomotion.
Instructions:
Lie on your back with legs together in front of the body. Place hands palm down underneath the glutes for stability.
Exhale & lift your legs to 90 degrees, bottoms of feet facing ceiling. Remember to relax your belly on the exhale. Hold for 5 breaths.
On an exhale, keep the left leg straight up & bring the right foot down to hover just above the floor. Hold for 3 breaths.
Bring right leg straight up. Exhale & bring left foot down to hover. Hold for 3 breaths.
Bring left foot up. Now bring both legs down to hover just above the floor for 3 breaths.
Inhale both legs up. Exhale down. Repeat ten times – you can do it!
Standing Poses
You’re warmed up & ready to go for standing poses!
Vrksasana — Tree Pose

Tree pose will give power to the important glute & upper leg muscles by working on your balance. It also helps to open the hip.
To help with balance, always set your gaze on a single point in front of you that isn’t moving.
Warning: Never place the foot against the inside of the knee in tree pose. Rest the foot on the floor, on the calf, or on the thigh.
Instructions:
Stand at the top of your mat, both feet together. Place the hands on the hips.
Pour your weight into the left foot so that your right foot starts to come off the floor. It’s OK to lean a little bit to the left side.
Turn the right foot so that the knee faces out, bringing your heel to the ankle. Squeeze your right glute. Keep pressing down through the left foot. It’s OK to stop here for 5 breaths if you feel unstable or your hip is very tight.
Otherwise, slide the right foot up the inside of the left leg. Stop at mid-calf, or slide it up to the inner thigh, grabbing it with your hand to place it. Press the foot into the leg & squeeze your left leg towards the midline to balance.
Keep the hands on the waist or bring them to a prayer position in front of the chest. Hold for 5 breaths, then switch sides.
Repeat 3 times.
Uttitha Hasta Padangustasana Variation — Single Leg Balance with Hand to Knee Pose

Tree pose opened the hips while working on balance; this next pose works the same hip flexor & stabilizer muscles for a strong core!
Instructions:
Stand at the front of your mat, feet together. Pour the weight into the left foot.
Bend the right knee and lift it towards you until you can place both hands on the knee. Find steadiness by focusing the eyes on one spot, squeezing the glutes, and pressing down through the left foot. Hold for 3 breaths.
Now, place left hand on left hip, and use the right hand to open the right knee towards the outside. Squeeze the right glute. Hold here for 3 breaths.
Exhale & slowly bring the right leg back in to grasp knee with both hands.
Bring the right foot down & switch sides.
Repeat each side 3 times.
Variation with Strap:
For those with tight hips, quads, or hamstrings, an alternate for this pose is to loop a yoga strap over the foot, then pull on the strap to lift the foot up.
Make sure to lift only as far as you can keep the leg straight by squeezing glutes, quads, and hamstrings. Straight & strong legs are more important than lifting the leg high up.
Utkatasana Pose — Chair Pose

Utkatasana is an excellent pose for reducing back pain by strengthening the lower body; plus, it can help reduce the risk of hip issues later in life if performed regularly.
You’re almost at the end of your core workout with this pose!
Instructions:
Stand at the top of the mat with feet hip-width apart. Place the hands in prayer position in front of the chest.
Tuck the tailbone down towards the floor to feel the back & abs engage.
Bend the knees and bring the glutes backwards in space to squat. Hold for 3 breaths. Repeat 3 times.
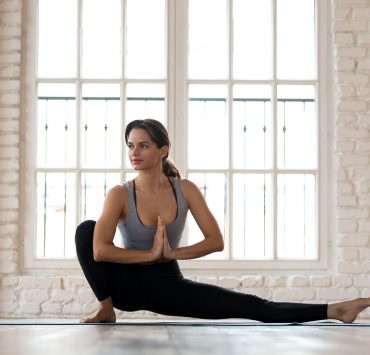
Virabhadrasana III — Warrior III Variation Pose
Everything you’ve done so far has prepared you to fly in Warrior III.
There are two variations here depending on how solid you feel. The second requires a table, chair, or other solid ledge to rest your hands to help with the balance.
Variation with Hands in Prayer:

Stand at the front of your mat, feet together, hands on hips.
Pour the weight into your left foot. Bend your right knee to 90 degrees with knee pointing towards the floor.
Exhale and slowly bring the chest towards the floor, pressing through the bottom foot. Keep the right knee bent until you’re as far as your body will allow, then straighten the top leg.
Squeeze the top leg glutes, quads, & hamstrings to keep it lifting. Finally, slowly bring the hands together to a prayer position in front of the chest.
Hold for 5 breaths. Switch sides. Do each side twice.
Coclusion
Performing this set of exercises two to three times a week will create a strong core, giving you a solid foundation for a more intense yoga practice or for other forms of exercise. Your body will naturally adapt over time and you’ll find that many of the exercises get easier. Good luck!