Back pain is pervasive throughout modern day cultures, largely due to the amount of time we spend sitting in chairs, in cars, and on the couch. With little daily activity that requires us to engage our core muscles, our posture suffers and pain is often the result. Back pain often becomes a chronic condition that we grow accustomed to. We often normalize the presence of it unwittingly. However, if we decide to explore the particular cause of this painful condition, we become empowered to incorporate new exercises and poses that help to mitigate back pain.
How Yoga Helps to Relieve Back Pain
Yoga helps to relieve back pain through various mechanisms. For starters, it helps to correct our posture, strengthen our muscles, and improve flexibility. On a cognitive level, yoga helps to decrease back pain as it positively impacts our cognitive assessment of our situation, reducing our propensity to catastrophize and increasing our conscious awareness of the body. Yoga also improves our neuroendocrine function through normalizing the HPA axis. Studies have found that dysfunction of this hypothalamic-pituitary-adrenal axis in many cases predicts the experience of chronic widespread pain.
Limitations on the efficacy of yoga on relieving back pain do exist. In cases of injury, it is especially important to properly assess what therapeutic movement is best for your specific case. Yoga is primarily beneficial in cases of non-specific back pain, specifically in individuals who have weak core muscles and poor posture. Before beginning any new workout or yoga practice it is important to get to the root cause of your particular experience of pain. Consult with a physical healthcare provider to determine the cause and best course of action.
15 Poses to Ease Back Pain
Salamba Balanasana — Child’s Pose

- Begin on your hands and knees in Table Top position, hands directly beneath the shoulders and knees directly beneath the hips. The tops of your feet should rest flat on the mat.
- Sink back so that your buttocks comes to rest on your heels. The feet can come together, big toes touching, while knees stay hip-distance apart.
- Allow your torso to fall overtop of your thighs. Stretch your arms out in front of you, letting your forearms and forehead rest on the mat.
- Breathe deeply, sinking further into this pose and feeling into a subtle stretch in the back. Hold for two to three minutes.
Baddha Konasana — Bound Angle Pose

- Begin in a seated position on your mat. Draw the soles of your feet together, wrapping your hands around your toes.
- Ensure that both sit bones are comfortable on the ground, or use a folded blanket or cushion beneath your buttocks for added height.
- Draw your feet towards your pelvis, bringing them as close as possible to your body while keeping the back straight.
- Let the shoulders relax and the chest open naturally. Do not force the knees down; let them fall with gravity as much as is comfortable.
- Hold the pose for one to two minutes before gently releasing.
Adho Mukha Svanasana — Downward Facing Dog Pose

- Begin in a neutral Table Top position. Hands are below the shoulders and knees are beneath the hips. The neck should be in line with the spine as you gaze towards the mat. Press firmly into the mat through the entirety of the hands.
- Tuck your toes to push backwards, lifting your knees off the mat. Raise your tailbone towards the ceiling and slightly backwards.
- Disperse your support evenly through the hands and feet, pressing your heels down towards the mat. Let the head fall comfortably without having it dangling loosely.
- Draw the shoulders away from the ears, guiding them gently towards the tailbone. Find stillness and breathe, holding the pose for 30 to 60 seconds.
Paschimottanasana — Seated Forward Fold Pose

- Begin in a seated position on the mat with your legs outstretched in front of you. Ensure that both sit bones are comfortably rooted to the ground.
- Inhale as your raise the arms up and overhead, elongating the spine.
- On your next exhalation, bend forward at the waist, allowing your torso to come forward and your hands to fall to your legs, ankles, or feet. Let them rest wherever is comfortable without curving the back to reach further. The back should remain straight. As you practice this pose regularly, you will naturally be able to bend and reach further; there is no need to push it.
- Keep the neck in line with the spine as you hold this pose. Hold for 30 to 60 seconds.
Salamba Bhujangasana — Sphinx Pose

- Begin on your stomach, with your forearms resting on the mat and your elbows beneath your shoulders. Your legs rest on the mat behind you side by side, tops of your feet resting on the floor.
- Press through the forearms and into the floor. Inhale as you raise your chest. Keep the neck in line with the spine as you gaze forward.
- Engage the thighs and buttocks as you press your pubic bone gently into the mat. Keep your elbows by your sides as you open the chest, pressing it forward slightly.
- Breathe as you hold for 30 to 60 seconds.
Bhujangasana — Cobra Pose

- An extension from Sphinx pose, begin in the same way, resting on your belly with your legs extending towards the back wall. Tops of the feet rest on the floor.
- Place your hands on the mat beneath your shoulders and tuck your elbows into your sides.
- Gently press the pubic bone and tops of the feet into the mat as you begin to straighten the arms, lifting the chest off the ground.
- Allow the shoulders to fall down the back naturally, opening the chest. Feel into a comfortable stretch in the back.
- If there is pressure or discomfort in the back, adjust the position by moving your hands away from the body, or by bringing the forearms down to the mat.
- Breathe, holding the pose for 30 to 45 seconds.
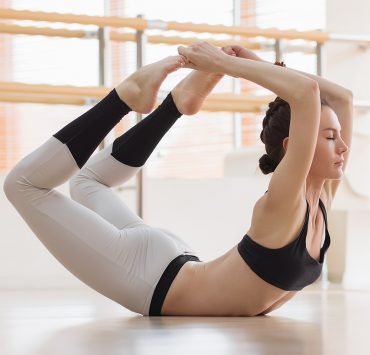
Dhanurasana — Bow Pose

- Start on your stomach with your arms resting by your sides. As this pose may put pressure on the hipbones, you may wish to place a folded blanket beneath this area of the body.
- Bend the knees so that your heels come towards your backside. Lift each hand to hold onto respective ankle and ensure that the knees are no more than hip-distance apart.
- As you inhale, raise your heels and lift your thighs away from the mat. The chest will rise naturally, as will the head. Allow your chest to open by gently guiding the shoulders away from the ears.
- Hold here for 20 to 30 seconds, gazing forward. Release gently by bringing your thighs and chest back down to the mat and then releasing your hands.
Setu Bandha Sarvangasana — Bridge Pose

- Begin on your back with your knees bent and feet planted on the mat, hip-distance apart. With palms facing down, your arms can rest by your sides. Adjust your feet accordingly so that your fingertips barely touch your heels.
- On your next inhalation, gently roll your spine up off the mat, your hips lifting up towards the ceiling. Press through the arms for support and open the chest. The chest pushes gently upwards and your shoulders naturally come towards each other for added support.
- Engage your thigh muscles and buttocks and interlace your fingers.
- Breathe as you hold for 30 to 60 seconds. Gently release by rolling slowly back down to the mat.
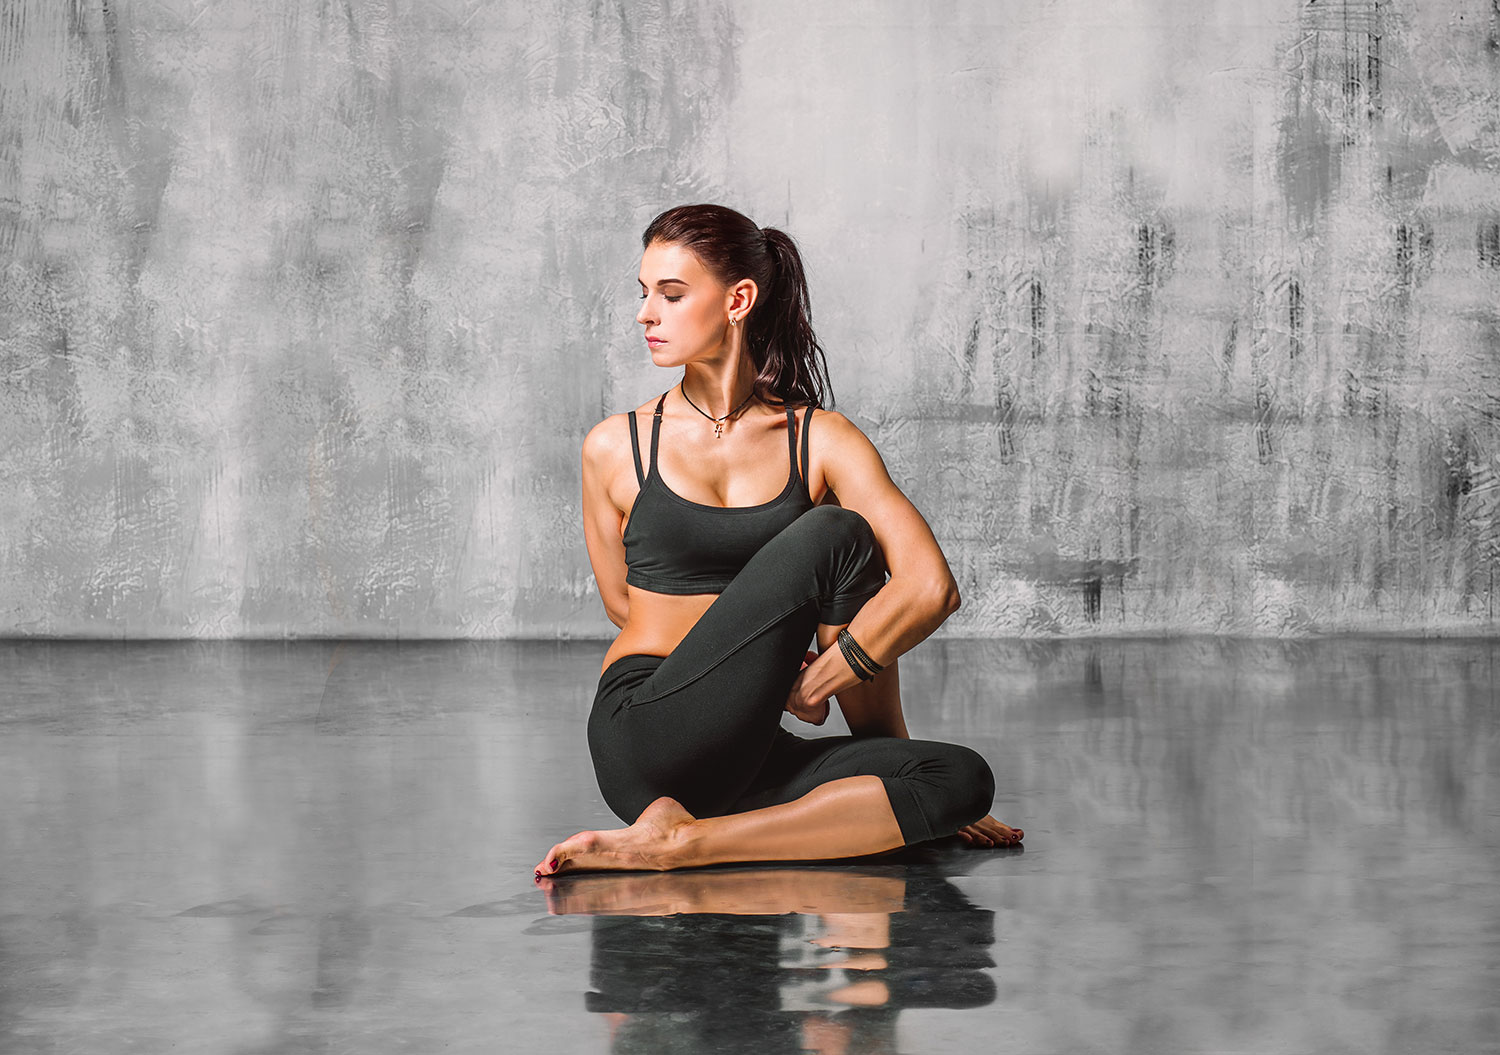
Ardha Matsyendrasana — Spinal Twist Pose

- Begin in a seated position with your buttocks resting on your heels. From here, shift your body towards the left side, letting your buttocks come to rest on the left side of your legs.
- Bending your right knee, raise your right foot and carry it over your left thigh. Place it on the floor outside of the left thigh.
- Extend your right arm upwards and turn the body gently to the right, placing your right hand on the floor behind you. Raise your left arm and bring it to the outside edge of your right thigh. Hold onto your right ankle with the left hand.
- Elongate the spine as you gently twist the body to gaze towards the back wall or as close to it as possible. Refrain from putting pressure on the neck to turn further than what feels natural and comfortable.
- Hold this pose for 60 seconds and then slowly release. Repeat the pose on the opposite side.
Salabhasana — Locust Pose

- Begin on your stomach with hands pointing backwards, arms resting by your sides. You may wish to place a folded blanket beneath your hipbones and ribs to avoid pressure in this area when you come into the pose.
- As you exhale, engage the core and buttocks as you gently raise your head, upper body, arms, and legs. Allow your stabilized core, stomach, and pelvis to support you.
- Reach through the legs and arms, pointing fingers and toes towards the wall behind you. Bring the shoulders away from the ears, allowing the chest to naturally open.
- Without putting pressure on the neck, gaze forward or at any point that brings comfort to neck. Hold this pose for 30 seconds and then gently release.
Garudasana — Eagle Pose

- For this pose, you may wish to stand in front of a wall that has a point for you to focus on. This will help your balance.
- Begin in a neutral standing position with your feet together. Bend your knees slightly and raise your left foot, finding balance on the right. Cross your left thigh over top of the right thigh, letting the left come to rest on the right. Your left toes can point towards the floor or can be hooked behind the right calf.
- Raise your arms parallel to the floor with palms facing one another. Let the shoulders gently fall backwards and then bend the elbows. Cross your arms so that the right upper arm rests on top of the left. You may wrap your hands so that the left fingers come into the right palm.
- Hold your focus on a point on the wall in front of you, finding balance in this pose. Hold for 20 to 30 seconds and then slowly release. Repeat on the opposite side.
Trikonasana — Triangle Pose

- Begin standing lengthwise on your mat. Your feet should be approximately three feet apart, though you may adjust this distance as you come into the pose.
- Raise your arms so that they are parallel to floor and your palms are facing down. Turn your right foot outwards, pointing towards the top of your mat. Your left foot remains perpendicular to the right foot, or turned towards it just slightly. The right heel and the arch of the left foot should be aligned.
- The right knee should be aligned with the right ankle, rotating the thigh outwards if necessary to achieve this.
- With your torso facing the long side of your mat, bend at the hip to extend your body over the right leg. Do not bend at the waist. Allow your right hand to fall where it may without pushing forcefully to reach further.
- Raise the left arm up towards the ceiling. If comfortable, turn your head gently to gaze up towards the left hand.
- Hold for 30 to 60 seconds before coming back up slowly and with control.
Supta Matsyendrasana — Reclined Spinal Twist Pose

- For this pose, come onto your back with legs extended and resting on the floor. Arms point outwards to form a “T” shape with the rest of the body.
- Bend your right knee and draw it towards the body. Shift your hips just slightly to the right.
- Use your left hand to carry your right knee over to the left side of the body. Let your right knee rest on the floor, your left hand resting on top of it.
- Gently turn your head towards the right, gazing towards your fingertips. Adjust your position in any way necessary for complete comfort. Breathe through this pose, holding it for one to two minutes before gently coming back to a neutral lying down position. Repeat on the opposite side.
Pawanmuktasana — Wind Relieving Pose

- Begin on your back, feet resting on the ground a short distance from the buttocks.
- Pressing your hands into the mat by your sides, engage the core as you raise your knees, pulling them in towards your chest.
- Find stability as you bring your arms up, wrapping them around your shins. Bring your hands to hold onto opposite elbows if possible. Let your head rest in a neutral position on the floor.
- Hug your knees in towards the chest as you feel into this gentle stretch of the back. Follow your breath as you hold the pose for 60 to 90 seconds and then gently release your feet back down to the mat.
Viparita Karani — Legs Up The Wall Pose

- For this pose, find an open wall and come to a seated position beside it with the left side of your body against the wall. Knees are bent and your feet rest on the floor in front of you.
- Engage the core as you gently roll your back and head down to the ground. Lift your feet and pivot your body so that the backs of your legs rest against the surface of the wall. Your soles face the ceiling.
- If possible, allow your sit bones to come right against the wall; a slight distance between them and the wall is okay. For extra comfort, you may wish to modify this pose by placing a folded blanket beneath your hips and buttocks.
- Hands can rest by your sides or on top of your belly. Close your eyes and breathe slowly and deeply.
- Hold this pose for five to ten minutes. Release by pushing your feet into the wall and lifting your hips slightly. Remove any supports you might have beneath you and gently come to one side.
Conclusion
During any yoga practice, remember to listen to the subtle cues of the body. This practice of deep listening will help you to intuitively understand which poses are best suited for you in any given moment. Of all the back relieving poses, some are better in certain cases and at certain moments than others. Take each pose slowly and if does not feel right for your body, slowly transition out of the asana and into the next. Find the poses that work for you and allow them to gently nourish you – body, mind, and spirit.