There is no such thing as “standardized perfect beach body” because what makes us perfect is nothing that we can measure, define, or compare. Having a beach body is then less about form and more about how we feel within our unique body because the truth is that beach bodies come in all shapes and sizes. Instead of striving for a particular look or shape, we can focus on toning and strengthening our physical body, which in turn, builds and supports our embodiment of confidence and radiance. Through toning and strengthening the entire body, we begin to understand that we look our best when we feel our best. It is a building practice we can support throughout the year, beach or no beach in sight.
There are no set requirements for what it takes to achieve a beach body; based on where we are at present, we will have some sort of understanding and sensitivity towards the individual areas that most require our love and support. With that said, this beach body sequence focuses on strengthening and toning the glutes, the core muscles, the legs, and the arms. In targeting numerous areas, a whole array of other muscle groups come into play such as those of the shoulders and back. An all-encompassing yoga practice is the best way to ensure that the entire body is engaged, stretched, and worked.
As with any yoga practice, using your inner guidance as to how long to hold poses and which ones to repeat will help you to become more in touch with your body. The more we start to pick up subtle bodily cues, the better we learn to provide it with sort of poses it most requires. In developing your own sequence, consider where you would like to feel stronger. Which areas of the body are calling for a deep stretch and which areas are calling to be strengthened? Engage and stretch these muscle groups predominantly while also incorporating poses that work to fill out your routine. As with any practice, it is important to note that contraindications exist for various poses. Consult with a certified teacher or healthcare professional to assess your unique needs and any existing predispositions at present.
Utkatasana — Chair Pose

This pose engages a number of areas of the body, strengthening the muscles in the thighs, arms, core, and shoulders.
- Stand on your mat with feet hip distance apart. Inhale as you raise your arms up, palms facing together, with fingers pointing towards the ceiling.
- On the next exhalation, bend your knees enough to bring your thighs as parallel to the floor as possible while retaining balance. Your torso will lean forward slightly. The thighs should remain parallel to one another.
- Keep your arms raised, in line with your neck and head. Bring your tailbone towards the floor and ensure that the back remains long.
- Hold the pose for 30 seconds. To release, slowly straighten the knees and lift through the arms to return to standing before allowing the arms to come back down to your sides.
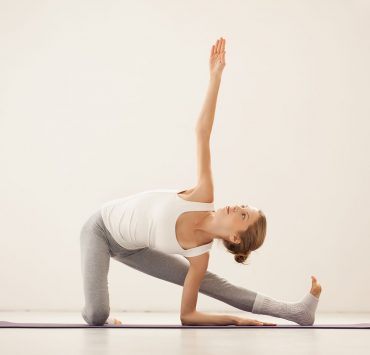
Trikonasana — Triangle Pose

Another full body asana, Triangle Pose tones the legs, arms, and sides. It also strengthens the knees and ankles.
- Stand facing lengthwise on your mat. The feet should be about three to four feet apart, but you can adjust as necessary throughout the pose.
- Lift your arms to your sides so that they are parallel with the floor, palms facing down.
- Turn your right foot so that your toes are pointing towards the top of your mat. Adjust the left foot if necessary to make it parallel with the narrow backend of the mat. Align your right heel with the arch of your left foot.
- With the right foot turned out, ensure that the right knee is still in line with the ankle ahead of it. If necessary, shift your foot positioning or rotate the thigh outwards in order to line the knee up with the ankle.
- Bend gently at the hip while keeping the torso facing the long edge of your mat. Extend your body over your right leg. Both sides of the torso should feel of equal length.
- Let the right hand land wherever it does so naturally. This might be on your right shin, ankle, or on the floor. Do not push it to reach further. With the left arm reaching upwards, form one straight line between both arms. Gaze forwards or towards your left fingertips of this is comfortable.
- Hold for 30 to 60 seconds before slowly bringing yourself back up. Rest in standing position for a few breaths before repeating on the opposite side.
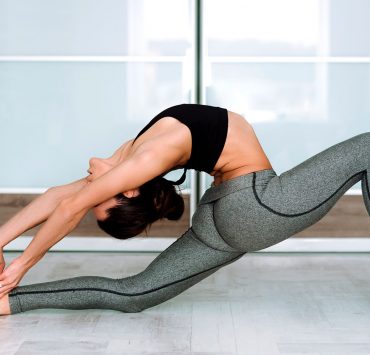
Bhujangasana — Cobra Pose

Cobra is a simple and nourishing pose that stretches and strengthens the core. It opens the heart and the chest.
- Come onto your stomach side on your mat, resting the tops of your feet on the floor. Bring your hands to the floor beneath your shoulders, spreading your fingertips. Bring your elbows into your sides.
- Pressing the thighs and pubis into the floor, slowly start to straighten the arms on inhale. Your chest will lift off the mat but only so far as your thighs and pelvis remain in contact with the floor. Press down through the thighs.
- Drop your shoulder blades along your back naturally as the chest expands. You should be in a comfortable backbend here. If it causes discomfort, you may move your hands further away from the body or bring your forearms to rest on the mat.
- Hold for 30 seconds before slowly coming back down onto the mat.
Paripurna Navasana — Boat Pose

This pose builds strength in the core and in the hip flexors while promoting balance and overall stability.
- Sit on your mat with knees bent and feet flat on the floor. Bring each hand around to hold onto the backs of the thighs.
- Lean back slightly, keeping the spine straight.
- Lift your feet slowly off the floor and raise them enough so that your shins are parallel to the floor. Gently let go of the backs of the thighs and extend the arms straight out ahead, also parallel with the ground beneath you. Palms may face towards one another or down towards the mat.
- Engage your core while keeping the back straight and opening the chest. Hold for 20 to 30 seconds.
- Gently release the pose, bringing your feet back down to the mat and bringing the torso back to neutral position. Pause for several breaths before repeating twice.
Virabhadrasana II — Warrior II Pose

Warrior poses are confidence and energy boosters. Warrior II opens the hips and strengthens the legs.
- Begin in a neutral standing position. From here, step your feet apart so that there is 3 to 4 feet between them. Turn your left foot to the left so that it faces towards the top of your mat. Your right foot should be parallel with the back of your mat or turned slightly inwards to align the right knee with the right ankle. Your left heel should line up with the arch of your right foot.
- Raise your arms and extend them outwards in opposite directions, in the outstretched direction of your legs, and so that they are parallel to the floor. Palms face down. The chest should be open.
- Bend your left knee so that it is above your left ankle. The shin should form a straight line between the ground and the ceiling. The left thigh should, if possible, be parallel with the floor. Press into the right foot for balance and strength.
- Ensure the arms remain parallel with the floor and the chest is open. The tailbone should be slightly tucked into the pelvis. Turn your head so that you gaze beyond the left fingertips.
- Hold for one minute before coming back into a neutral standing position and repeating the pose on the opposite side.
Virabhadrasana III — Warrior III Pose

Warrior III is a pose that strengthens numerous muscle groups. It works the shoulders, hamstrings, back, and calves while also toning core muscles.
- Begin in a lunge position with the left foot forward and your left knee above the ankle. The right foot is behind you facing forward with toes tucked. Stretch your arms out in front of you, palms facing each other
- Lean forward slowly to bring your weight onto your left foot. As you slowly find your balance, carefully lift your right foot off the floor. Engage the left leg for support.
- Hips should remain facing forward and begin to point towards the floor as you lean.
- Take your time with this pose, eventually reaching a point where you can comfortably form a straight line between the raised leg and outstretched arms. Balance here on your supporting foot for 30 seconds before gently lowering back down through a steady reverse motion. Take a few breaths and repeat on the opposite side.
Salabhasana — Locust Pose

This pose strengthens the buttocks, the spine, the hamstrings, and the backs of the arms.
- Begin lying on your stomach with arms by your sides. To avoid pressure on the hip bones and ribs, you may wish to place a folded blanket beneath these areas. Forehead rests on the floor as do the tops of your feet.
- On the next exhalation, stabilize the core and firm your buttocks as you raise your head, upper torso, arms and legs away from the ground. Your lower ribs, stomach, and pelvis support you. Reach through the legs and arms, all pointing stretching out behind you. Allow the chest to open.
- Gaze forward slightly without crunching the neck or adding any pressure to it. Hold for 30 seconds before releasing back down. Pause for a few long breaths and repeat one more time.
Phalakasana — Plank Pose

Plank pose is well known as an abdominal strengthener and also helps to tone the arms.
- Begin kneeling on your mat, buttocks resting on your heels. Bend forward to bring forearms to the mat as if coming into an alternative version of tabletop position. Tuck your toes.
- Engaging the muscles in your abdominals, glutes, legs, and arms, push up off of your knees and onto your toes. Ensure that your back and legs form one straight line. This is a forearm plank position.
- If you are comfortable here, you may slowly and steadily lift one forearm at a time, coming onto your hands. Feel into the body once more to ensure that your back and legs are in one line. The neck should be neutral, remaining as an extension of the spine.
- Hold for 20 seconds before slowly reversing the motion. Repeat this pose once or twice more.
Vasisthasana — Side Plank Pose

This is an alternative form of the traditional plank that strengthens the core muscles, specifically along the sides of the body. It is also great for promoting balance and arm strength.
- From Plank Pose, step your feet together and shift your weight into your right hand and forearm. With control, roll your body to the right so that you are resting firmly on the outer edge of your right foot. Your left foot can come to rest on top of the right, inner edges touching one another.
- Lift up through the hips and engage the thighs to maintain a straight line throughout the body. Slowly extend your left arm up to the ceiling, engaging both arms.
- If comfortable, gaze up towards your raised hand. Find strength and stability in the hand and arm beneath you.
- Hold for 20 to 30 seconds before slowly returning to plank and then back down. Pause for a few breaths and then repeat on the opposite side.
Adho Mukha Svanasana — Downward Facing Dog Split

An extension of Downward Dog, this pose increases range of motion in the hips and strengthens both the core and the arms.
- Begin in Downward Dog before raising your right leg off the floor. Engage your core and arms to support you as you lift.
- Keep the hips squared with the ground as you continue to lift your right leg towards the ceiling. Press gently into your supporting left heel. Hold the pose here for a few long breaths.
- To take the pose further, steadily open the right hip. You can bend the knee towards the buttocks. Hold for a few breaths.
- Straighten the right leg as you turn back into a neutral position. Release the raised foot back down. Pause here in Downward Dog for a few full breaths before repeating on the opposite side.
When we boil it down, the most important part of maintaining a beach body year-round is that we maintain self-love as a strong hold; when we are self-loving, we radiate confidence, self-esteem, and vitality – and it shows. Through year-round stretching and strengthening, we help to promote this deeper sense of what it means to embody a beach body.