Just starting yoga for the first time? Congratulations! Yoga is an awesome way to tone, strengthen, stretch, and reinvigorate your body. It is also scientifically proven to reduce stress and boost your immune system. Whether you like to practice in a studio or using YouTube, every beginning yogi can benefit from mastering the following five poses. If nothing else, this foundation of five poses can be practiced daily for incredible health benefits.
Tadasana — Mountain Pose

While it seems like the simplest yoga pose of all, Mountain Pose (Tadasana) can be one of the hardest to get right! Mountain Pose is a subtle yoga pose that provides a foundation for every single yoga pose out there. The sankirt name for Mountain Pose, Tadasana, comes from the root word “tada” which means “mountain,” and of course “asana,” which means “pose.” Mountain Pose helps you stand strong and tall, and over time can correct poor posture.
Whether it’s twists, forward folds, or inversions, the anatomical principles that you learn in a perfect Mountain Pose will help you perform all yoga poses properly. Mastering Mountain Pose can also help you bring yoga off the mat and into your everyday life. You do not have to be in a yoga studio to practice this pose. You can practice Mountain Pose while standing in line, doing the dishes, brushing your teeth, and even while walking.
When you stand in Mountain Pose, you can incorporate all kinds of variations. Sometimes the hands and arms fall to the sides of the body, and other times you might be called to place your hands in prayer position over your heart. When learning this pose as a beginner, take your time and have fun with it. Two incredible things you can do to improve your posture with this pose is to practice against a wall or in front of a mirror. You can also stand in Mountain Pose and take you photo in order to notice any postural problems.
How to Practice Mountain Pose (Tadasana)
1. Start this pose by standing at the front of your mat with your feet touching and the heels slightly apart. Shift your body weight back and forth until you feel you are centered over the four corners of the feet.
2. Activate your thigh muscles and feel your kneecaps lifting up. Point your tailbone to the floor and lift the front of your pelvis upwards. Imagine that an invisible string is pulling your body straight up towards the ceiling.
3. Draw your shoulder blades back and down, keeping the movement gentle and subtle. Open your chest by drawing the collarbones up and back.
4. Center your head in the middle of your body.
5. Make sure your body is stacked with a plum line down the center – shoulders in line with hips, hips in line with knees, and knees in line with ankles.
6. Breath deep and calm, and focus your gaze on a point in front of you.
7. Practicing this pose regularly can improve posture, balance, spinal alignment, breathing capacity, and strengthen back muscles.
Adho Mukha Svānāsana — Downward Facing Dog Pose

If you are just getting started with yoga, one of the most important poses to master is Downward Facing Dog. This pose is incorporated in nearly every yoga sequence imaginable – and for good reason! Downward Facing Dog stretches the hands, hamstrings, calves, shoulders, and feet all in one pose. At first, this pose might seem very challenging because you are upside down and in a bit of a strange position – it can be hard to find the right alignment without a yoga teacher assisting you in this pose. One tip is to practice Downward Facing Dog in from of a mirror or with an anchored yoga strap. (See how to anchor a yoga strap around a door jam here.)
How to Practice Downward Facing Dog (Adho Mukha Svānāsana)
1. Begin in tabletop position with your hands below your shoulders and knees below your hips.
2. On an exhale, engage your core, curl your toes, and lift your knees off the ground, pushing up to straight legs.
3. Stretch your tailbone back and up towards the ceiling.
4. Hold the pose for 30 seconds to a minute, and release back down to your knees.
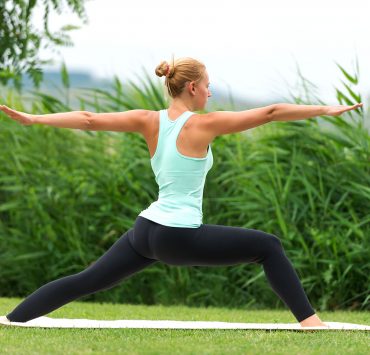
Utthita Trikonasana — Triangle Pose

There are so many benefits to Triangle Pose! First of all, it stretches nearly every part of your body – hips, groin, hamstrings, calves, shoulders, chest, and spine. It also stimulates the psoas and abdominal organs with the twisting motions, and is great for improving digestion. Triangle Pose is also stress relieving and is great for backaches, sciatica, neck pain, and anxiety. This pose can be really tricky for beginners, so it is best to practice with your hand on a block (instead of on the floor or your leg). This will allow you to fully feel the main actions of the pose. If stability is an issue or if you find the pose challenging, you can also practice with your back against a wall. This will keep your movement in the proper frame of your body.
How to Practice Triangle Pose (Utthita Trikonasana)
1. To begin, stand in Mountain Pose. Step your feet 3-4 ft. apart and raise your arms so that they are parallel to the floor.
2. Turn your left foot slightly to the right, and place the right foot at a 90 degree angle. Your heels should be in line. Make sure your front kneecap is in line with your ankle.
3. Extend your torso over the left leg and bend down from the hip joint. Rotate your torso to the left and rest your hand on your calf, ankle, or the floor. You can also place your hand on a yoga block.
4. Keep your head neutral.
5. Stay in the pose for 1 minute and be sure to practice on the opposite side as well.
Balasana — Child’s Pose

Every good yoga sequence has the following elements: centering poses, standing poses, heating poses, cooling poses, twists, and of course, relaxation poses. One of the best and easiest relaxation poses you can do is Child’s Pose. Whether you are cooling off between your Sun Salutations or ending your day with a little relaxation, Child’s Pose can help calm your mind, body, and spirit. This pose stimulates your digestive organs, stretches your hips and back, and has several options for modification. You practice this pose in bed or on a yoga mat. For a restorative and extra relaxing experience practice Child’s Pose over a yoga bolster and hold it for up to 30 minutes.
How to Practice Child’s Pose (Balasana)
1. Kneel on all fours. Exhale and lower your hips to rest on your heels. Lean forward until your forehead touches the floor. Depending on what is comfortable, you can make your knees wide or close together.
2. Stretch your arms overhead, keeping the palms face down on the floor. You can also fold your arms and rest your head on top or let your arms fall to your sides.
3. Once you are in the position, focus on your breath. Breathe slowly in an out, putting all of your focus on the diaphragm. Hold the pose as little as four breaths or as long as 30 minutes with the proper support.
Savasana — Corpse Pose/Final Resting Pose

Corpse Pose is the final resting pose for every yoga sequence. And while this pose looks like the easiest of all, it can be the most challenging for beginners. Depending on your body, you might feel uncomfortable laying on the floor. And, depending on your mental state, it might be hard to sink into the relaxation or allow yourself to be vulnerable. In Corpse Pose, the goal is to completely relax your body and allow your mind to get quiet. The pose releases all tension in the body so that you can absorb all of the benefits of your yoga practice. It also helps to refocus and center the mind, leaving behind all the chattering of the ego. (Source)
How to Practice Corpse Pose (Savasana)
1. If you are practicing at home, set a timer for 5 to 15 minutes. Dim or turn off the lights if possible. Gather a few props like blankets and pillows to make yourself comfortable.
2. Lay on your back on your yoga mat. Be sure to cover up with a blanket if you are cold. Let your arms and legs fall to the sides naturally.
3. If there is tension in your neck, prop the head slightly with a pillow or folded blanket.
4. Close your eyes and take a deep breath through your nose. Let your body get heavy and feel your back relax into the floor. Focus on breathing through your nose at a natural rhythm.
5. If you are struggling to relax, scan your body from head to toe, noticing where you are holding tightness. Wiggle or shake those areas to release tension.
6. Feel free to use an eye mask or lavender cushion to encourage your consciousness inward. A savasana practice can be the perfect way to begin meditation.
7. When you’re ready to come out of the pose, roll to the right side and slowly come up to a seated position. Sit and absorb the feeling for a moment, and continue into a seated meditation if so desired.