You don’t need to be balancing on one arm or twisted into a pretzel to get an incredible workout during yoga. Simple postures, when done correctly, lengthen and strengthen your muscles while calming the channels of the mind and relieving any aches or pains. In 20 minutes you’ll break a sweat and leave your mat feeling an increase of flexibility in body and mind. Follow the sequence below, listening to the innate wisdom of your body to know when it’s appropriate to push further and when you should back off.
Warmup
Before bringing movement to the body, take a moment to check in with your current physical state. Find your way into a simple seated position or lay flat on your back with eyes closed to draw the senses inward. Use this stillness as an opportunity to observe your tension, and focus on breathing more space and ease into those areas. As the unnecessary stress begins to fade away, notice where you’re experiencing freedom and openness in the body. Take as long as you need in this quiet space before adding in some subtle movement.
After you’ve taken some time to address how you’re doing mentally and physically, it’s appropriate to connect the breath to subtle movements. If you’re in a seated position try some easy neck rolls, shoulder stretches, or gentle twists. Starting from a reclined place, try bringing some length to the side body or entering some hamstring stretches. At this point, you already know what your body needs, so follow your intuition and explore what feels right in the moment.
Marjaryasana — Cat/Cow Pose

Spinal waves are an excellent introduction to any yoga practice, offering a sweet union of breath to movement. Find your way to all fours with wrists stacked under shoulders and knees under hips. Spread your fingers wide and root down in the space between the thumb and index finger. As you inhale, let the belly drop down while the gaze and tailbone lift up. On an exhale, press in the hands and feet to round the spine while tucking the tailbone and chin. Imagine a broadening across the upper back and a drawing inward of the naval on the breath out. Continue to flow between these movements for 3-5 rounds, tracking the breath all the way in and following it all the way out. Stay engaged and aware of the fluidity of the spine as you warm up.
Adho Mukha Svanasana — Downward Facing Dog

Most yoga classes feature downward dog several times, so it’s good to become familiar with the proper alignment of the posture. It’s a highly active shape, but also offers a place of rest between sequences. From a tabletop position, move the hands slightly forward and tuck the toes. Spread the fingers wide and draw the forearms towards each other. On an inhale lift the knees to hover off the mat while feeling the core engage. Exhale and send the hips up and back to lengthen out the legs. Let the head a neck relax as you root down firmly through the hands and feet. Take any movements that feel appropriate, pedaling the feet or waving the hips. Stay in this shape for 3 to 5 breaths before continuing.
Phalakasana — Plank Pose

Holding plank isn’t a favorite for many people, but the benefits of the pose are worth the extra effort. From your downward facing dog inhale high onto the balls of the feet and roll the spine forward to stack wrists under shoulders. Press down through the hands to broaden the upper back and cultivate a stable foundation. Keep a straight spine by descending the tailbone back towards the heels and energizing the legs. Hold your gaze roughly a foot ahead of the hands as you take 5 nice deep breaths. Try to focus your attention on how strong and capable your body is rather than collapse under the difficult nature of this pose.
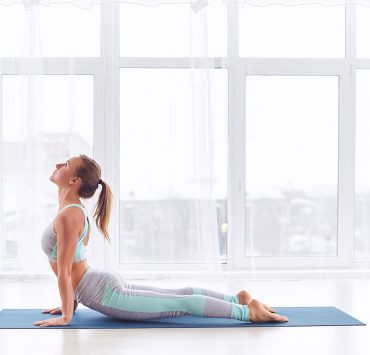
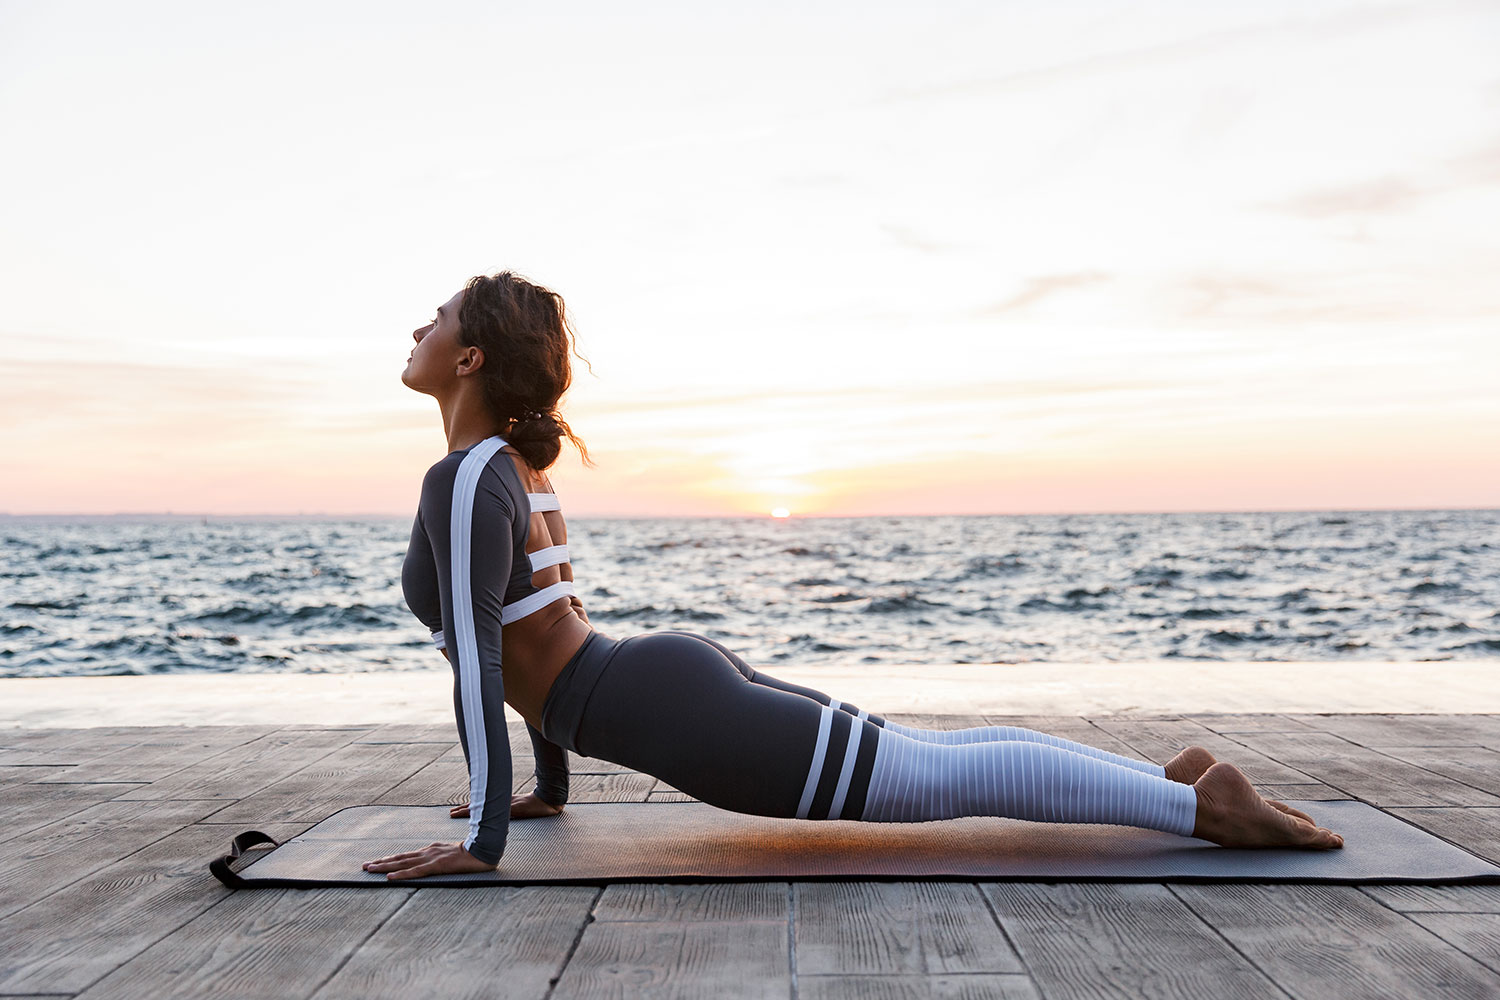
Urdhvamukha Shvanasana — Upward Facing Dog Pose

Upward facing dog is a wonderful entry to backbends in any practice as long as you listen to the limitations of your body. Take one more deep inhale through your plank pose, and as you breathe out shift the shoulders slightly forward and slowly lower halfway down. Hug the elbows in close to the side-body and as a breath comes in, send the arms straight and press the tops of the feet down until the knees lift. Drop the shoulders back to open across the chest and keep a lift through the crown of the head. Breathe fully here for 3 to 5 rounds before releasing down to your belly.
Eka Pada Adho Mukha Svanasana — One-Legged Down Dog

Let’s incorporate some more action to our traditional downward dog and really fire up the legs! Starting on your belly, bring the palms right under the shoulders and press down on an inhale to either shift weight back onto your knees, or press up to plank. Exhale to send the hips up and back into a downward facing dog. Bring the soles of the feet together and inhale your right leg straight back behind, keeping the hips level and the toes facing down. Exhale to return your right leg down to the mat and repeat this process on the other side. Continue to go back and forth for several rounds on each side.
Virabhadrasana I — Warrior I

Nothing demonstrates the strength and energy held by the body more than a sequence of warrior postures. Find your inner warrior and stand your ground powerfully. With one leg lifted in downward dog, exhale to step your foot between the thumbs. Turn the back foot flat at a 45-degree angle and squeeze the thighs as you inhale the arms up by your ears. As your arms make their way up, turn the pinkys in and let the shoulder blades soften down the back. Draw the hip on the side of the bent leg back and settle the pelvis down and forward. Actively press through the back foot to energize the entire back leg as you lift through the upper body. Continue to breathe through 3-5 cycles before taking a vinyasa and switching sides.
Virabhadrasana II — Warrior II

Take one last inhale in warrior I before exhaling to turn on the back foot, aligning front heel to back arch. Settle deeply into the front knee and press it open towards the pinky toe edge of the mat. Feel the tailbone rooting towards the floor as you open the arms to the sides. Remember to reach equally in both directions and follow your gaze over the front hand. With each breath out, allow the shoulders to ease down the back and the thighs to draw inward. Stay for 3-5 cycles of breath then run through a vinyasa and enter the other side.
Viparita Virabhadrasana — Reverse Warrior

Side-waist stretches are excellent for bringing space to constricted areas along the spine, but also prove challenging to maintain. As you inhale from your warrior II, flip the front palm and bring your arm overhead, reaching behind. The back arm will travel down the hind leg as you continue to bend deeply through the front knee. Keep your attention on lengthening through the waist as you continue to breathe through several rounds. Flow through a vinyasa before finding your way to the other side.
Trikonasana — Triangle Pose

Triangle pose represents far more than achieving stunning geometric form. It’s a challenging, yet highly advantageous, posture that opens both our minds and our bodies. From reverse warrior, inhale the spine upright with arms in a T-shape. Exhale and reach the front arm as far forward as possible while sending the hips back. When you can’t reach forward any further, drop your hand down to either your shin or a block on the outside of the front leg. Reach the opposite arm straight up towards the ceiling, letting the gaze follow if it feels good on the neck, and firmly root down through the back foot to stack the hips. Take 3-5 deep breaths into this shape.
Prasarita Padottanasana — Wide-Legged Forward Bend

Forward folds are the perfect combination of action and surrender, bringing length and space to the entire back line of the body. This wide-legged variation offers a release for the inner seam of the legs while being highly customizable to fit any needs. Follow a breath in from your triangle to come upright using the weight of the back foot and arm. Bring both hands to your hips and pigeon the toes in slightly. Inhale to dip the tailbone down and lift the heart up, then exhale and hinge at the waist and fold forward. Let the arms rest wherever it feels most beneficial, maybe experimenting with grabbing your ankles, or opposite elbows. As you take 5-10 full breaths here, pull the inhale from the feet and up through both hips points, then trace the exhale from the pelvis and out through the crown of the head.
Vrksasana — Tree Pose

Putting your balance to the test will calm the mind, work the core, and challenge the lower body. How we react to the wobbles that come with balancing postures is reflective of how we embrace or resist life’s inevitable obstacles. Come to the front of your mat with feet together and hands on hips. Gaze down at your left foot and spread the toes wide as you begin to shift weight over. As it feels appropriate, bring your right foot up to either the inner thigh, mid-calf, or kickstand it on the ankle of the left leg. Let the right knee open back, and the hands come to rest at hearts center. Feel the descent of the tailbone and the lift of the heart while keeping your gaze steadily fixed on one point. An extra challenge here is to lift the arms overhead and possibly let the gaze follow suit. Continue to breathe here for 5-10 rounds before trying the other leg. Remember that there are no ‘good’ or ‘bad’ sides of the body, just embrace what they uniquely have to offer.
Utkatasana — Chair Pose

Turn up the heat in the legs and relish in your strength as you find chair pose! At the top of your mat, bring the big toes together, leaving about an inch between the heels. Take a deep breath in and lift the arm bones up by the ears as you sink low and back into the hips. Draw the navel in towards the spine and stay elevated in the upper body as you continue to challenge your power by settling into the hips. Shift the weight back into the heels and take 3-5 deep breaths here, or more if you’re seeking an extra thrill.
Uttanasana — Standing Forward Fold Pose

A forward fold is just the sweet release you’ll be seeking after holding chair pose, and your legs will thank you for it. Let the upper body drape over your legs, keeping them as bent as you’d like. The more substantial the bend in the legs, the deeper the release can be in the lower back. Let the arms go heavy to the floor, or grab opposite elbows, and let yourself fully surrender to gravity. Take any movements here that feel appropriate like swaying side to side or hanging weight slightly forward into the toes. Another option is the widen your stance and fold with feet just outside of hips distance. Stay here as long as you’d like, using the breath as a tool to cool the body.