We use our hands almost every minute of the day! When it comes to eating, self-care, driving, typing, cleaning, cooking, you name it. The health of our wrists is extremely important in these everyday activities. Unfortunately, fine motor tasks and certain movements can weaken and cause pain in the wrists overtime, adding strain to the joints, muscles, tendons, and ligaments. While repetitive motions can cause injury to our hands, specific stretches and strengthening exercises in yoga can greatly help repair and improve wrist quality. Here are 10 poses for strong, healthy wrists that you can do right on your mat.
Wrist Anatomy

The wrist is a complex joint, made up of a network of bones and soft tissues. The major bones of the wrists are the radius, ulna and carpals. These connect to the metacarpals and phalanges of the hands. There are several ligaments that connect the bones, and just as many tendons connecting bones to muscles. The small muscles of the wrist surround the joint and provide the wrist with the ability to move in all different directions.
The wrist is also a synovial joint, meaning that fluid is secreted around the joint to reduce friction through movement. To increase synovial fluid production, try these warm up exercises for your wrists.
Wrist Warm Ups

It is important to warm up the wrist joints by moving them methodically and repetitively. These exercises should feel good, and at most a stretch, but never painful.
1. Interlace your fingers and hold your hands together. Slowly begin to circle your hands in a figure eight pattern. After doing this 10 times, figure eight your hands in the opposite direction.
2. With one hand, make a loose fist. Make a motion as if you were knocking on someone’s door with a lot of laxity in the wrist joint. Repeat this knocking motion 10 times, then switch hands and continue on the other side.
3. Stick your right hand out like a traffic cop. Place your left hand against the palm side of your right fingers. Slowly push your fingers towards you for 2 seconds, then release. Repeat this 5 times, then switch sides and repeat with the other hand.
4. Stick your right hand in front of your with fingers pointing down, bending at the wrist. Gently push your left hand on the back of the right palm towards your for 2 seconds, then release. Repeat this 5 times, then switch sides and repeat with the other hand.
You are now ready for a strong wrist posture sequence!
Adho Mukha Svanasana — Downward-Facing Dog Pose

This beginner’s posture is great for the entire body. Downward Dog is often performed in a Sun Salutation sequence.
1. Come onto the mat on your hands and knees in table position. Hands should be under the shoulders with knees under the hips.
2. Spread your fingers wide apart on the mat and firmly press down with the palms. Tuck your toes underneath and press them into the mat.
3. Exhale, lift your knees off the mat and keep them parallel to each other as you straighten the legs.
4. Once the legs are completely straight, press your heels towards the back of the mat. Lift the tailbone up towards the ceiling.
5. To avoid putting too much weight on your shoulders, press your chest towards your thighs and face the inner elbow creases towards each other.
6. Keep the head between the upper arms, and gaze in between the hands. Hold this posture for 5-10 breaths.
7. To release, return your knees back to the earth in table position. Take child’s pose for a counter stretch.
Adho Mukha Vrksasana — Handstand Pose

Handstand is an advanced posture. If you are new to this, begin against a wall for support and have someone spot you if possible.
1. Come onto your mat on all fours. If you need a wall, place the short end of your mat against the wall and face the wall as close as you can.
2. Exhale and lift into downward dog pose. Come onto your tiptoes, and press your hands firmly into the mat.
3. Shift the weight of your shoulders over the hands. Bring your gaze in between your hands.
4. Lift your dominant leg up towards the ceiling, with toes pointed. When you feel ready, push off of the leg that is on the floor and bring this knee into the chest.
5. If you fall back down, that is okay! Continue to kick up until your shoulders are firmly stacked over the hands and you can maintain balance.
6. Straighten the bent knee to meet the other straight leg. Hold this posture for 5 breaths or more.
7. To release, bring one leg down and then the other into downward dog. Come back to table posture on your mat.
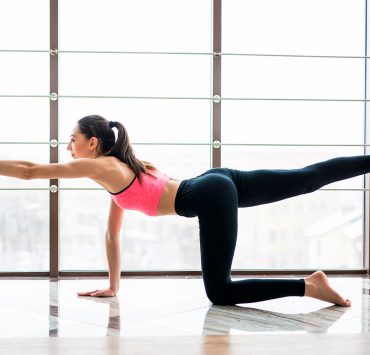
Marjaryasana-Bitilasana — Cat-Cow Pose

Cat-Cow Pose is a gentle posture that elongates the spine while strengthening the wrists and hands.
1. Come onto your mat in a table position. Knees are directly under the hips and wrists are underneath the shoulders. Spread your fingers out wide on the mat with your head in neutral.
2. Inhale, lift the tailbone up towards the ceiling, drop your belly towards the floor, lift the chest and collarbones, then bring your chin and head up last. You are in cow pose!
3. Exhale, tuck your tailbone down, bring the belly into the spine, round the back, bring your chin into the chest, and press the hands firmly into the mat to open the shoulders. Welcome to cat pose!
4. Repeat these motions with inhales and exhales 10 times each.
5. To release, bring your body back to a neutral table position. Take child’s pose for a few breaths.
Kumbhakasana — Plank Pose

This intermediate yoga posture is excellent for toning and strengthening your core, back, arms, shoulders, and wrists. Plank pose is often performed in a Sun Salutation sequence.
1. Start in Adho Mukha Svanasana, downward dog.
2. On an inhale, bring your torso towards your hands until your arms are perpendicular to the floor.
3. Align your shoulders directly over your wrists, and make sure that your belly is as parallel to the floor as possible by tucking your belly button in towards your spine.
4. Spread your shoulder blades wide apart as you firmly press into the hands.
5. Tuck the tailbone slightly as you draw your heels towards the back of the mat.
6. Lengthen the crown away from your shoulders to elongate your neck. Bring your gaze to the top of your mat.
7. Hold posture for 10 breaths.
8. To release, lower your knees to the earth and send the hips towards the heels in Child’s Pose.
Chaturanga Dandasana – Four-Limbed Staff Pose

This intermediate posture is a challenge for the arms and core, while also strengthening the wrists and shoulders. Four limbed staff pose is often performed in a Sun Salutation sequence, following plank pose and preceding upward dog pose.
1. Begin in Plank Pose. Come onto the balls of your feet with your heels elevated off the mat.
2. As if you were squeezing a pencil under your armpits, keep the elbows tight to the midline of the body.
3. Exhale, bend at the elbows, and lower your body down towards the mat until your chest, torso and thighs are hovering over the floor. Keep the hips tucked as you lower.
4. Keep the chin elevated and gaze to the top of your mat in front of you.
5. Hold chaturanga dandasana for at least 5 breaths, or longer if you can.
6. To release, lower your body down to the floor. Fold the arms on the floor, underneath the head, and rest one cheek on the forearms. Elevate your lower legs, bending at the knees, and rock them from side to side.
Urdhva Mukha Svanasana — Upward-Facing Dog Pose

While this posture can be confused with cobra pose, it utilizes the wrists and opens the chest even more. Upward dog is often performed in a Sun Salutation sequence, after four limbed staff pose and before downward dog.
1. Lay on your belly on your mat with the tops of your feet resting on the earth. Legs are extended straight behind you.
2. Place your hands by your waist and spread your palms wide on the mat. Your forearms should be relatively perpendicular to the floor.
3. Inhale, and press firmly into the hands and feet. Lift the chest, torso, pelvis, thighs, and shins off the floor. The elbow creases should face away from you as you straighten your arms.
4. Lift your chin slightly and draw your shoulder blades back to open the chest.
5. Gently squeeze the thighs together without clenching the buttocks.
6. Hold posture for at least 5 breaths.
7. To release, you can either transition into a downward dog posture or lower your body back to the floor.
Mayurasana — Peacock pose

This advanced, arm balancing posture challenges the arms, wrists, back and core, and it requires steady focus.
1. Begin kneeling on your mat. Open the knees wide apart and sit on your heels.
2. Press your palms on the floor in front of you with your fingers slightly turned back towards you. The thumbs will point out to the sides and the pinky sides of the hands should touch.
3. Bend your elbows and bring the forearms together. Bring your knees to the outside of your arms.
4. Press your belly into the backs of your upper arms and tuck your elbows deep into your belly, around the belly button.
5. Firm your belly against the elbows. Lower your forehead to the floor.
6. Straighten your legs and stretch them behind you, keeping the tops of your feet on the mat.
7. Gently squeeze the glutes and press your shoulders slightly down. Lift your head off the floor and bring your gaze forward beyond your mat.
8. Lean your weight slightly forward. As long as you maintain tightness in the legs and glutes, your weight will shift your feet off the floor.
9. Position your torso and legs parallel to the floor and hold balance here for at least 5-10 breaths.
10. To release, lower your body down to the floor and rock the knees from side to side.
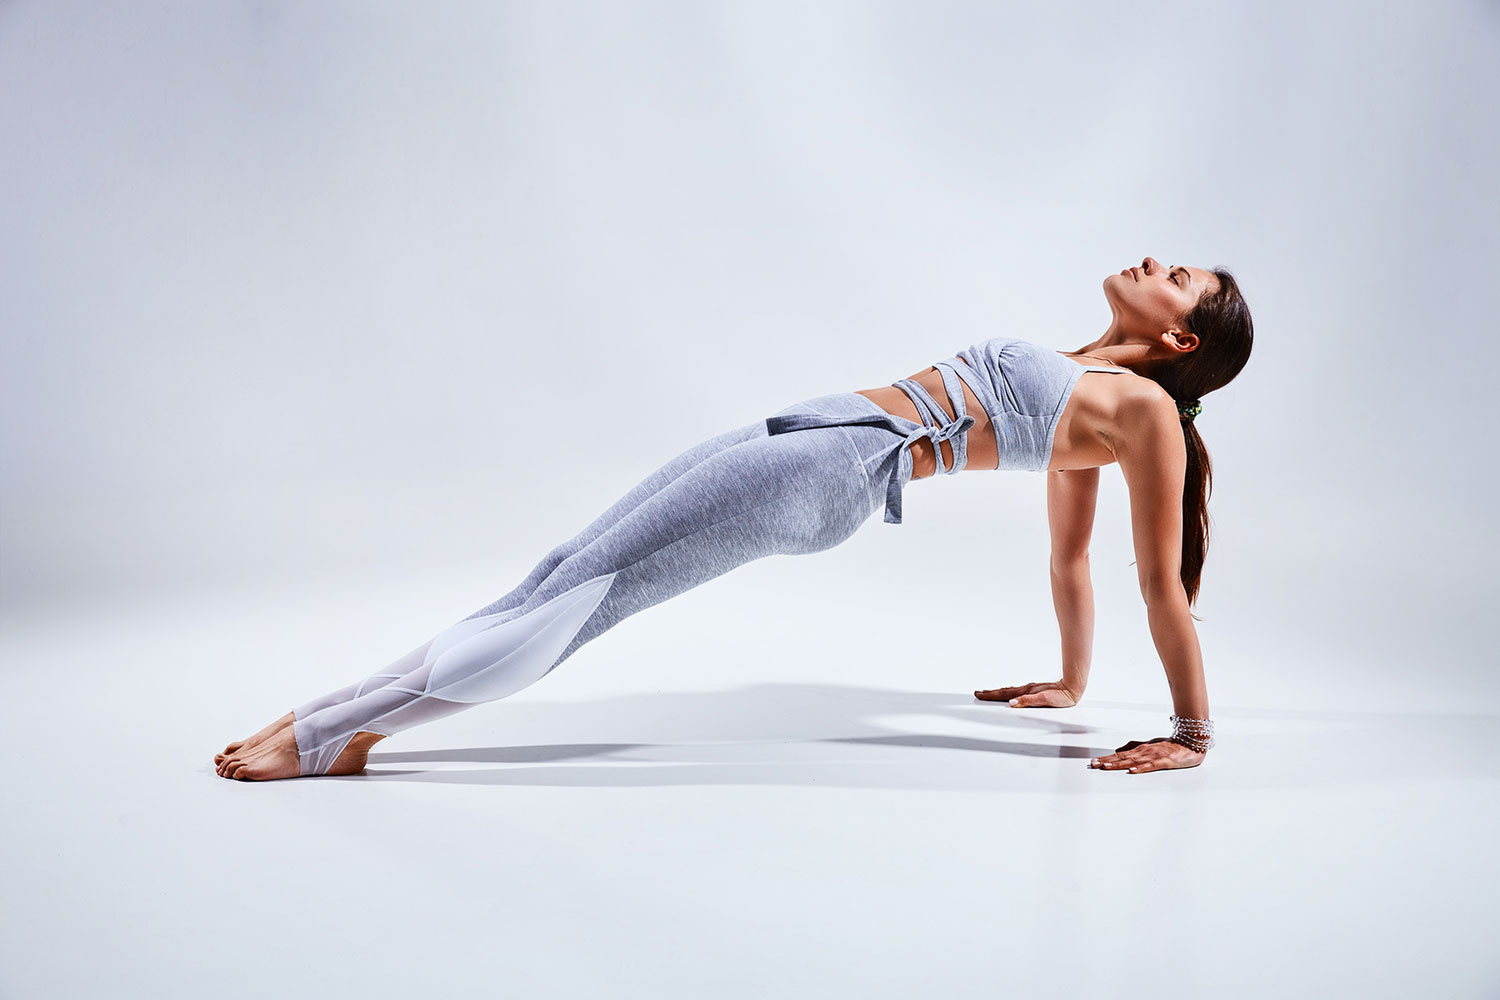
Vasisthasana — Side Plank Pose

Side Plank is an intermediate arm balancing pose that activates the wrists, shoulders and core.
1. Begin in plank pose on your mat.
2. Shift your weight onto the outside edge of your right foot and stack your left foot on top, maintaining strength in the legs.
3. Press into your right hand, keep your right arm straight, and lift the left hand off the floor.
4. Place your hand on your left hip as you slightly rotate the body to face the long side of your mat. Your body should resemble a straight line at 45 degrees.
5. Elongate the neck and draw the shoulder blades away from the torso.
6. Extend your left arm up towards the ceiling and stretch your fingers. Firm the muscles in the right arm.
7. Hold posture for at least 5 breaths. Lower yourself back into plank position, and repeat on the other side.
8. To release, lower the body to the earth and take child’s pose for 10 breaths.
Purvottanasana — Upward Plank Pose

This is an excellent stretch for the entire front body, including the pectorals and psoas, while strengthening the wrists and back.
1. Begin in dandasana on your mat. Place your hands several inches behind your hips with your fingers pointing towards your toes.
2. Place your feet on the earth one foot away from your sitz bones with knees bent.
3. Exhale, press into the hands and feet until you are in a reverse table position.
4. Keep your hips elevated and straighten the legs. Guide your shoulder blades together and open the chest.
5. Extend the chin to the ceiling and elongate the neck. You can drop it back behind you if you wish.
6. Hold here for 10 breaths. To release, lower your body down to the earth back to staff pose.
Bhujapidasana — Shoulder Pressing Pose

Shoulder pressing pose in an intermediate arm balancing posture that strengthens the arms, wrists and core.
1. Come into a squatting position on your mat with the knees wide apart.
2. Weave your arms behind the legs and place your hands wide apart on the floor behind the ankles. Lower your torso forward and between the thighs.
3. Tuck your upper arms under the knees as high as possible, and slightly elevate the hips. Your back should be rounded.
4. Bend your elbows slightly and press into the hands, lifting your body off the floor. Keep pressing the arms out into the thighs.
5. Bring the feet towards each other and hook ankles if you can. Hold posture for at least 5 breaths.
6. To release, lower your sitz bones down to the earth.
It’s all in the wrist!
These wrist strengthening postures vary from easy to challenging, making this list of poses great for beginner yogis to the most advanced students. Keeping the wrists healthy and strong is vital to everyday functionality and joint health. Remember to do your warm ups and check in with your body throughout practice to make sure that your joints feel healthy and happy. It’s important to not overdo it with any specific area of the body, so take your time with these postures and pace yourself. Most of all, have fun and enjoy playing with your yoga practice!