But yoga, when done with mindful awareness of your body, can help rehabilitate and maintain hip health for better quality of life as we age. Tight and weak hip flexors can lead to other chronic ailments such as back pain, difficulties walking, sitting, and getting up, and hip pain which may lead to even less proper exercise and more major injuries and degeneration that may require hip replacement surgery to correct.
Our hips are the biggest and very easily the most important joints in our body. The hips bear the weight of our body from both the top and the bottom when we sit, stand, walk, and run. The hip flexors can also be extremely flexible which makes them easily prone to injury in women after yoga if the strength and mobility is not properly developed first.
In just 30 minutes, this simple yoga sequence can help you have healthier hips which will lead to a healthier, happier life of free and painless movement. Just remember to move carefully and be gentle with your body, even if you know you are naturally flexible, work on finding that yogic balance of strength, stability, grace, and comfort.
Savasana — Corpse Pose

Although Savasana is usually the last pose in a yoga class, it’s also beneficial to start of your yoga practice in this reclining asana of complete relaxation. It helps to get the entire body and mind prepare for your practice and get into a mindset of listening to the body to heal it, rather than pushing it to its maximum limits.
It’s also one of the few times, aside from sleeping, when the hips don’t have to take the weight of the whole body so you can visualize breathing into your hips to create more space and flexibility if they are tight, and strength and stability if you are hyper flexible.
Stay in Savasana with eyes closed to start your yoga practice for at least one minute.
Apanasana — Knees to Chest Posewith Twist Pose

From Savasana, slide your heels together so your legs are centered on the mat and bring your left knee towards your chest hold your knee here without any extra effort to push or pull it closer to you. After a few breaths in this position, bring your knee across and over to the right side of your body to create a gentle spinal twist. Allow your left knee and foot to completely rest on the floor even if your left shoulder needs to come off the ground if needed.
Stay in this twist for at least three minutes before bringing the knee back to center and switching to the right knee to the chest and twisting.
When both sides are finished, reset in Savasana.
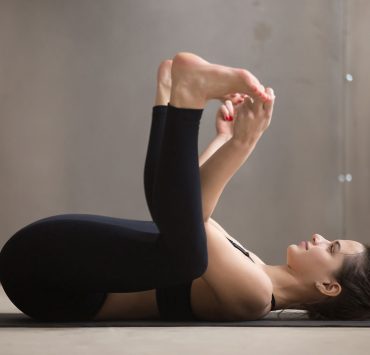
Ananda Balasana — Happy Baby Pose

From Savasana, hug both knees to the center of your chest while keeping the back of your head on the floor. Then open up your knees in the direction of your armpits. Slide your arms on the inside of your legs and grab your feet from the outside or hold your big toes with your index and middle fingers. Keep your feet flexed and heels pointing towards the sky for Happy Baby Pose, also called Dead Bug Pose in some yoga schools.
If you cannot reach your feet in this asana, use a yoga strap or two to loop around your feet. Remember, we want to gently create space and flexibility, not force the joints into further injury.
Stay in Ananda Balasana for three minutes and very gently release your feet.
Savasana — Corpse Pose

It’s important to move slowly and mindfully after working in any long holds in an asana. Resting in Savasana for at least one minute to pause and check in to your body will instill good habits of understanding how each asana makes you feel and how it benefits you or not. So cherish every chance you get to rest in poses like Savasana in between each asana.
Sukhasana — Easy Seated

After a minute or more in Savasana, slowly roll over to one side and push yourself up into a comfortable seated position. If staying seated, cross legged on the floor is not comfortable for you, you can try sitting on a block, propping up your knees with pillows, or kneel instead of sitting. You can also adjust your kneeling position with blocks, pillows, or rolled up blankets to suit you comfort.
Whether you are seated in Sukhasana or kneeling, keep your spine straight with a gently engaged core, shoulders rolled back and down away from the ears and arms relaxed with palms either facing up or down on your knees or thighs.
Stay in this pose for at least one minute.
Baddha Konasana — Seated Butterfly with Tiger Paw and/or Foot Massage

Sit on the floor and bring the soles of your feet together in front of you. Depending on your flexibility, your heels may be close to your groin, or a bit further away from you, creating a diamond shape with your legs.
Again, use blocks, rolled up blankets, or pillows to support your knees if your hips are not yet open.
While holding Baddha Konasana for three minutes, you may also try interlacing your fingers in-between your toes to give them a bit of a massage. You may also massage the soles of your feet with your thumbs. In Chinese reflexology, each part of the foot corresponds to a different organ or body system, so paying extra attention to your feet while in Butterfly pose, will also help to promote better overall health.
Balasana — Child’s Pose

Carefully transition to a relaxed, hip opening Child’s Pose by setting up in a kneeling position the bring you big toes together as your knees slide out almost as wide as your mat. Keep your sit bones connected to your heels and if they begin to lose contact, back off a few inches from the pose.
Let your fingertips walk forward and imagine your chest and forehead melting into the ground. If your chest does not reach the floor, you may place a bolster of a pile of pillows underneath you so you can completely rest your torso and arms. In time, you will be able to lower your body and your hips gently open up when they are ready.
Stay in Child’s Pose for at least one minute. This pose alone is already a great, gentle hip opener.
Supta Sucirandhrasana — Supine Windshield Wiper Pose

Slowly push yourself up from Child’s Pose and bring your legs in front of you. Hold yourself up with your palms a few inches behind you, and bend your knees, keeping your feet about as wide as your mat.
On your next exhale, lower both of your knees down towards the left. Inhale, and raise them back up to center. Exhale, and lower them down to the right this time. Inhale, and bring them back up to center.
Continue this Windshield Wiper motion with your legs for about one minute.
Gomukhasana — Cow Face Pose

Gomukhasana can be a deep hip opener which also helps to decompress the sacrum and lower back. To get into the pose, sit and bring your left heel towards your right hip so that your knee is centered pointing in front of you. Stick your right knee over your left knee.
If you can’t get your knees neatly stacked yet, your right knee may hover over your left knee, or you may extend your left leg forward so there’s less force on your hips.
Your arms may be in traditional Gomukhasana where your right arm reaches above and behind your head, holding the base of your skull. The opposite arm may reach for the right hand from behind or hold on to a strap if the fingers can’t reach each other yet.
Whether you choose to hold this arm position or not, tilt your upper body forward to stretch your hips and sacrum without lifting your sit bones from the floor.
Stay in Gomukhasana breathing at a steady and relaxed pace for three minutes and very slowly anf mindfully switch to the other side with the left knee stacked over the right. Follow any adjustment or modification needed for this side of your body.
Malasana — Garland Pose

Malasana in one of the deepest squats your body can get into, but do note that anatomically, some people will just never be able to get into this posture.
But for most people, the invention of the chair completely changed the way people sit so not many get to put their body into this position anymore.
If a full squat is not possible for your body yey whether it be due to tight hips or anatomy, use blocks, or other props to sit on with stability and safety.
Remain in this squatting poses for a minimum of three minutes.
Uttanasana — Standing Forward Fold Pose (any variation)

Stretching the hamstring will also benefit the hips because it will allow more mobility and range of motion in your legs. Give yourself a good stretch with either a standing or seated forward fold. In any variation, ensure that your kneecaps are lifted — not locked! — to target your hamstrings properly.
To modify a seated forward fold, sit on blocks. To modify a standing forward fold, lean against a wall or use blocks underneath your hands if you cannot reach the floor.
In whichever variation of forward fold you choose, hold it for three minutes.
Virasana or Supta Virasana — Hero or Reclined Hero

Hero can be one of the most restorative hip opening poses for your body. In Virasana, from a kneeling position, open up your heels slightly wider than your hips sp you can sit on the ground. The tops of your feet should be flat on the ground. Open up your knees as needed for comfort in the pose.
If you can sit easily in Virasana, you may try the reclined version of the pose by slowly coming down first on your elbows and lying on your back. If you can’t lay down completely, place a bolster or stacks of pillows or blankets behind you to lay on.
Stay in Virasana or Supta Virasana for at least three minutes.
Apanasana — Wind Removing Pose

Hug both knees towards your chest, keeping the back of your head on the mat. Transition to Apanasana by placing your palms on your knees facing away from you. Your fingers may hook over your kneecap. Keep your legs soft as most of the movement will come from your arms.
Synchronizing with your breath, push your knees away from your body as you inhale, extending your arms. On your exhale, pull your knees towards your chest again, imagining that stagnant or excess air and blockages are expelled with your breath.
Continue this Wind Removing Pose for one minute.
Savasana — Corpse Pose

Finally, end your 30 minute hip opening yoga practice the same way you began, in Savasana. Check in with your self and notice if your body, especially your hips and legs, feel different from when you began.
Stay in your final resting pose for as long as your body needs to rest, rejuvenate, and recover. Do not rush to your next task by cutting short your Savasana time. Practice being in the moment by doing nothing but being on your mat.
Conclusion
Hip health is so important for mobility and general quality of life. With mindful attention to what your own body is telling you, you will be able to use your yoga practice to focus on creating a perfect balance of stability and flexibility in your hip flexors.