Paving the way for yogic living in Nebraska, Jacqueline Roberts…
The statistics on low back pain are alarming. This condition is the most prevalent type of pain in the world and is one of the top reasons people miss work annually. And that’s just workdays. These statistics don’t account for the unknown number of outings, birthday parties, dates, and genuine time spent with loved ones that get cancelled due to debilitating back pain.
Unfortunately, lower back pain is quite common in the US, with 80% of Americans expected to experience it sometime in their lives. The good news is that there is something we can do about it. From alternative therapies to postural support, there are natural and non-invasive ways we can help reverse the sheer amount of back pain we experience.
One of the best and most effective ways to combat lower back pain is, of course, yoga! A regular practice aimed at helping to reestablish form and function of the lower back muscles can make all the difference in the health of your back. Yoga is an adaptive and easy exercise regimen that can fit into nearly anyone’s schedule and ability.
The following fifteen yoga poses are specifically known to help rehabilitate the muscles, joints, and spine of the low back. Practice these asanas daily to help encourage healing and a strong, new lower back.
First Step: Protect Your Back
Yoga is known for helping improve pain all over the body, but there have been times when symptoms or injuries has worsened after yoga. This is typically due to over-stretching, over-working, or poor form during yoga practice.
If you are currently experiencing back pain, ease into your yoga practice with care and consideration. You are the expert of your own body. if a pose doesn’t feel great – move on! There is no need to perform this set in its entirety if a certain move or two doesn’t align with the condition of your back. We are all different and will find different things challenging. Work up to them, don’t push it!
Another great way to protect your back while also getting the most our of your yoga practice is to make use of props. If you are ready to invest in some yoga props, we’d recommend two foam blocks and a strap. To keep things simple at the start, however, even just a heavy blanket will do. This can be folded and placed below your hips, under elbows, or under knees depending on the asana to help you get more out of your pose without putting your body at risk.
Now that we are prepared for a safe and healing practice, let’s get going!
Uttanasana — Standing Forward Fold Pose

The Forward Fold is the perfect way to start our lower back sequence. Forward Fold gently stretches and opens the lower back, allowing for space and movement.
How to: Start by standing in mountain pose, with your feet firmly planted on the ground, shoulders back, and chest raised. Take a deep breath in, then slowly exhale. Inhale again swooping your arms up overhead, then exhale and slowly bend forward towards your feet into forward fold position. Find what is comfortable for you and rest your hands on either your toes, shins, or knees. You should feel a stretch in the lower back, but no pain. Take three full breaths in Forward fold.
Adho Mukha Svanasana — Downward Facing Dog Pose

To get a little more movement in the lower back, hips, and legs, we will move into Downward Dog. This classic pose is great for back pain because it reverses the typical force that gravity has on our spines. By sending the spine down and forward, we can use this force to open and release through the entire spinal column.
How to: Gently come to the floor onto hands and knees. Plant your hands and toes firmly on the ground, then with an exhale, stretch the knees and send your head down to come to downward dog. Bend your knees slightly or pedal the legs to find the best position for you in the pose. Exhale and slowly straighten the legs. Stay strong through your fingers and lift your belly button up to your spine. Take 3-5 breaths here.
Agnistambhasana — Fire Log Pose

The Firelog Pose or “ankles-to-knees” pose is a great starting position if you are new to yoga or if you need a comfortable way to sit during meditation or breathing practice. It aligns the hips and relieves pressure from your low back and piriformis muscle.
How to: Start on the floor in a seated position. Bend your knees and rest your feet on the floor. For this position we will stack our legs on top of each other. Slide the right food under the left knee, and place the left foot on top of the right knee. You may rest your hands on top of your knees or take a prayer position at the heart. If it feels comfortable to you, enhance the stretch by bending forward slightly.Take 5-10 deep, full breaths before switching leg placement.
Marjaryasana — Cat/Cow Pose

When you suffer from chronic low back pain, there may be no better remedy than a few minutes of Cat-Cow stretching. This simple movement helps to link the breath and the movement of the spine to release tension and course blood through the entire area.
How to: Return to the mat on hands and knees, making sure your knees are hip width apart. Palms should be firmly placed on the ground, underneath your shoulders in a tabletop position. On an exhale, slowly roll your back to the sky, tuck your chin to your chest to come to cat. Feel the spine stretch and open, breathe into any areas of tightness or rigidity. On the inhale, arch your back, bring your navel to the ground, and lift the head high to look at the sky for Cow. Repeat this sequence 5-8 times.
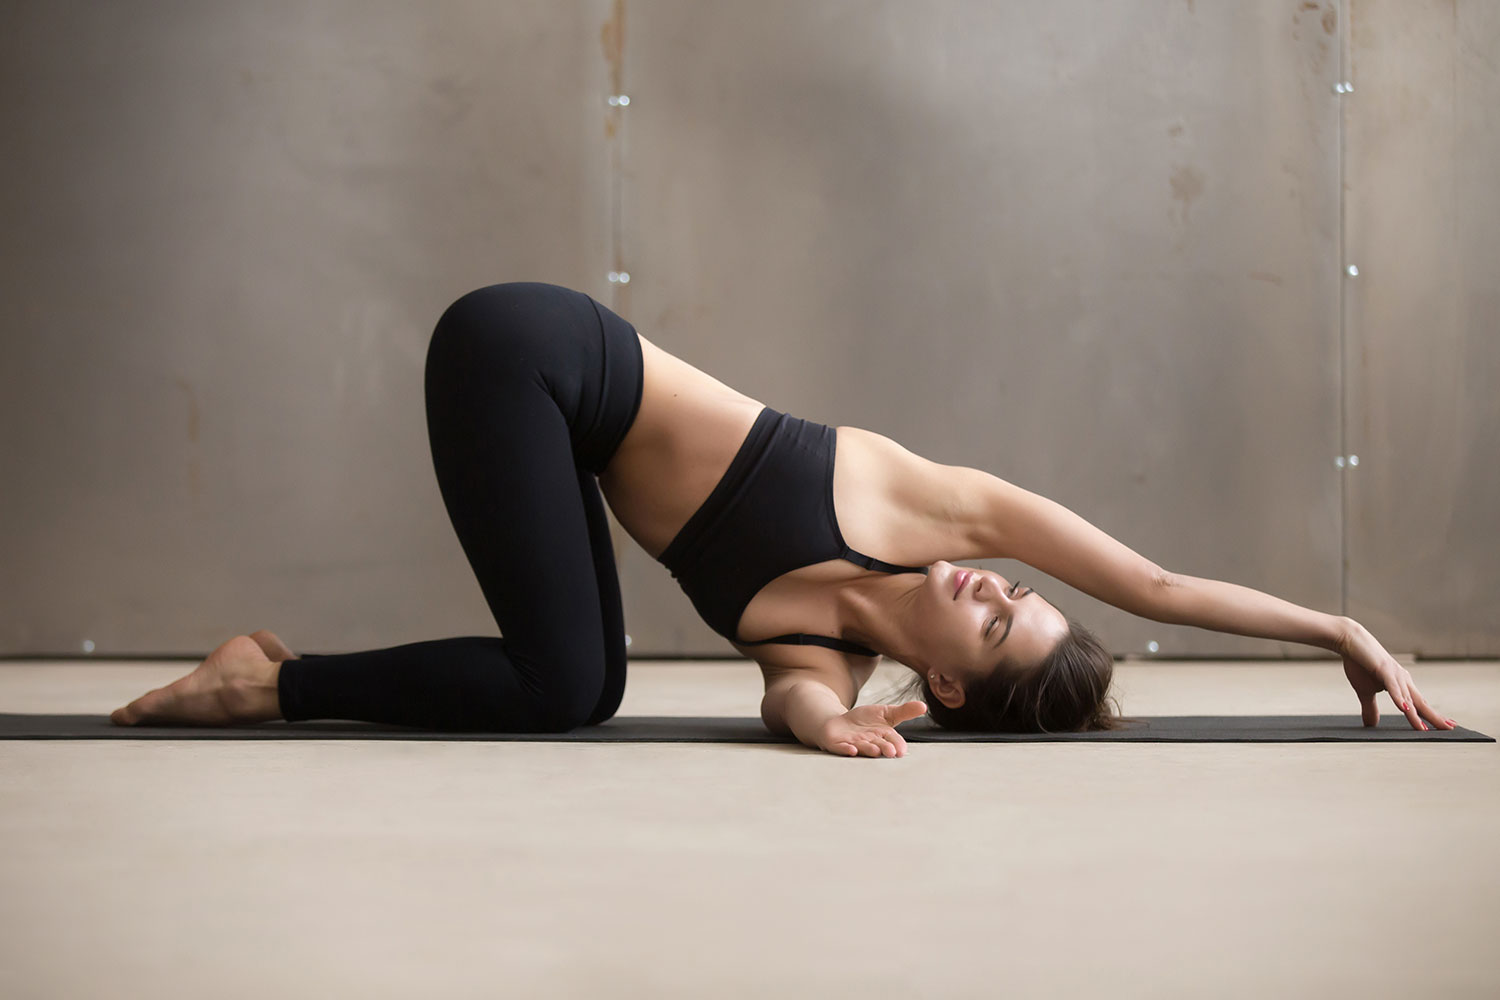
Parsva Balasana — Thread the Needle Pose

This is a twisting pose that helps to wring out the spine and bring fresh blood and oxygen to the area. It stimulates the muscles of the back including the erector spinae and the lattissimuss dorsi. It offers a fabulous stretch for the entire torso.
How to: Start on your mat in a tabletop position, making sure your wrists are planted underneath your shoulders. Shift weight to your left arm and slide the right arm under the left, as though you were threading a needle. Your shoulder should rest on the ground below. Turn your head to the left. Rest here for 3-5 breath cycles, then draw the arm back up to tabletop position. Repeat with the left side.
Salamba Balanasana — Child’s Pose

Child’s pose is a wonderful place to rest or stretch for a variety of issues. For low back pain, this pose helps to gently stretch the spine and lower gluteal muscles.
How to: Kneel on the floor with your knees spread slightly wider than your hips. Rest your bottom on your heels and straighten your back. Exhale and gently lower your torso forward to rest in between your thighs. Place your forehead to the floor, and your arms down by your sides or up over head if you prefer. Rest here for as long as is comfortable.
Eka Pada Rajakapotasana — Pigeon Pose

Pigeon is an amazing pose to stretch not just the low back, but the piriformis and gluteal muscles that can also have a role in low back pain. Take it easy with this one at first if you are new to yoga or have pain while attempting Pigeon. Start slow and use your blocks or blanket to bolster your hip.
How to: Begin on all fours, then slide the right leg up towards the top of the mat. As your right knee reaches your right wrist, allow the leg to bend so that the right foot lays near the left wrist. The left leg rests behind you relaxed. Prop your head up by resting yourself on your forearms bend further into the pose if your body allows. Rest here for several breaths or as long as is comfortable before repeating with the left leg.
Bhujangasana — Cobra Pose

To counteract all the forward bending we have done, let’s take a Cobra pose to bend back and strengthen our spinal muscles.
How to: Find a comfortable position lying face down on your mat. Keep your legs together and feet pointing towards the wall behind you. With your hands planted directly below your shoulders, spread your fingers to create stability. Inhale, lift the chest and straighten your arms while keeping your legs and pubic bone firmly on the ground. You should feel your lower back muscles engage. Draw your shoulder blades together to open the chest. Take 2-3 full breaths in Cobra, then exhale to slowly release down to the floor. You can work your way up, taking one extra breath each time for 2-3 more times.
Malasana — Garland Pose

Garland Pose is a great pose to help strengthen and stretch those nearby muscles that help to support your low back.
How to: Bend your knees and come to a squatting position. Keep your heels on the floor if possible. If they do not reach the floor, grab your blanket to give them added support. You’re your elbows inside your knees, pressing into the with a gentle push back from your knees. Bring your hands to the heart in anjali mudra, or prayer position. Rest here for 5-8 breaths.
Apanasana — Knees to Chest Pose

This pose is an amazing stretch to do on it’s own or as a morning stretch to wake up the back from a night’s sleep. It helps to relieve pain and tension in all of the muscles of the back as well as the hips.
How to: Lie on your back your arms resting by your sides and your legs straight out in front of you. On an inhale, lift your legs and bring them in as close to your chest as you comfortably can. Grasp or hug your shins with your arms and breathe into the stretch. You can roll from side-to-side to help massage the back and apply pressure to the low back muscles.
Supta Matsyendrasana — Reclined Spinal Twist Pose

The spinal twist will help us continue the amazing stretch we began with the Thread-the-Needle pose. This asana can be a great way to release after a workout or to stretch out the day’s tensions.
How to: Begin by laying flat on the floor, on your back. Bend your knees and place your feet on the floor ahead of you. Extend your arms out to each side. Slowly drop both knees to the right while twisting your torso and head to the left. Feel the stretch in the entire body. Take 3-5 breaths here before returning to a neutral position. Then repeat on the opposite side, knees to the left and torso to the right.
Ardha Survangasana — Half Shoulder Stand Pose

The half shoulder-stand is a gentle way to take some pressure off the low back and hips while stimulating your balance and strength.
How to: Lie ion your back with your arms resting by your sides, palms down. Slowly bend your knees and bring them up to your head, resting your palms on your low back. Gently unbend your knees and lift your legs overhead. Find where you have good balance and are not overstrained. You may choose to use a blanket or block for support under your back. Rest here for 10 breaths if comfortable. Then, slowly and gently descend, bending the knees and returning your feet to the ground.
Ananda Balasana — Happy Baby Pose

Happy Baby is a favorite among those with back or hip pain because it allows for a gentle stretch with a playful feel.
How to: Start by lying flat on your back. On an exhale, bend your knees into your belly and grasp the outsides of your feet with your hands. Try to hold on to your pinky toes or use a strap. Open the hips and knees then pull them towards your shoulders. Rest in this position or gently sway back and forth to massage the back.
Viparita Karani — Legs Up The Wall Pose

For a relaxing and healing posture, take a few minutes per day in Legs-Up-the-Wall pose. This pose is often used in yin yoga to help release wound-up fascia and provide a deep yet relaxing stretch.
How to: Find a spot on the floor near a wall. Raise your legs up to rest on the wall and move your bottom as close to the wall as possible. Your back should be resting on the floor. Now in your posture, you may choose to keep your legs straight or extend them in a ‘V’ position. Your arms may rest by your sides, on your lower belly, or over your heart. Stay here for 5-10 minutes if time allows.
Savasana — Supported Corpse Pose

Corpse pose, or Savasana, is the classic way to end a yoga session. However, in this series we are modifying this closing pose to make it even more useful for healing low back pain. As a supported pose, we will need a blanket or block to help us release and relieve tension.
How to: Sit on your mat with your knees bent and feet flat on the ground. Place a rolled blanket, towel, or block beneath your bent knees. Then slowly lie down into corpse pose. The support under your knees will help to keep your lower spine open and free while you rest in this final posture. Rest here for several minutes.
Get Back at It
Back pain can be a debilitating problem that greatly affects productivity and general quality of life. Many people resort to harmful medications or costly surgeries that sometimes offer little relief. Yoga provides a safe and accessible alternative that anyone can try. Daily practice is the best way to start to heal your back pain, but take it easy and start slow. If you choose to practice in a class, make sure to let your teacher know you have back pain so they can help you adjust and modify in the best way for your body. It’s never too late to use yoga to help heal and restore, and get back to the life you love!
What's Your Reaction?
Paving the way for yogic living in Nebraska, Jacqueline Roberts is adored by her students as a constant source of support and inspiration. A knack for writing allows her to share what she has learned with the world.


